Exporting Substance Painter Files to Maya
Using an "Arnold Renderer" Maya Workflow
Note that this page assumes use of an Arnold aiStandardSurface material. For other material types, this documentation will probably not work.
Exporting as "PBR Standard" File Format
PBR Standard refers to the selected file type in Substance Painter, when first starting a project.
This controls the format that files are ultimately exported as. If this needs to be changed, it can be changed by going to ???
The PBR Standard will provide the files for the following types, which should be transferred to your Maya (Arnold) material accordingly:
| Substance Attribute | Material Location | "Color Space" | "Alpha is Luminance" | Other Notes |
|---|---|---|---|---|
| Base Color | Base > Color | sRGB | Unchecked (False) | |
| Metalic | Base > Metalness | Utility > Raw | Checked (True) | |
| Roughness | Specular > Roughness | Utility > Raw | Checked (True) | |
| Normals | Bump2D > Bump Value | Utility > Raw | Checked (True) | Change "Use as" from "Bump" to "Tangent Space Normals" |
| Height | Utility > Raw | Checked (True) | Not sure if this is fully correct. Effect seems to be excessive and the Exposure setting should be turned down quite a bit. Feel free to play around with this one to get it right. |
Locating the Material Properties in Maya
General Adjustments

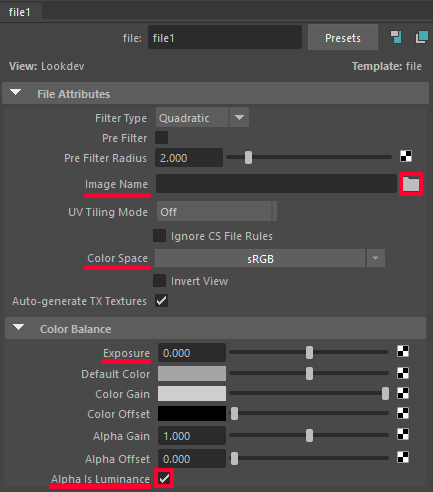
This is the screen we'll see for all the following properties, after telling it to import as a file.
The "Image Name" property is where we define our file location to reference.
Then "Color Space" will need to be set to either sRGB or RAW. See the table at the top of this page for details.
The Alpha is Luminance property also needs to be set based on the material. Once again, see the table at the top of this page for details.
Finally, these various properties under the "Color Balance" section affect how the texture is read in. For example, Exposure is very useful if the texture effect is too strong for some reason. We can turn the Exposure down to adjust how intensely the texture affects our material.
BaseColor, Roughness, and Metallic

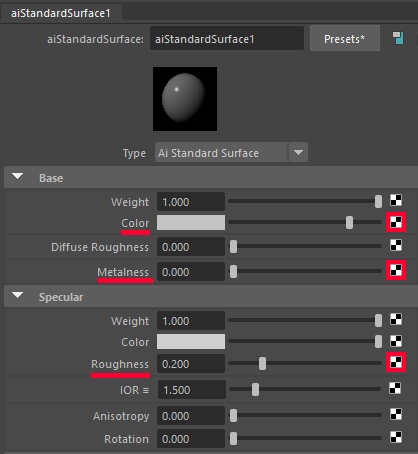
These three properties are towards the top of the material. For each, click the checkerbox on the right hand side, then select File in the window that pops up.
NOTE: There are two "roughness" properties visible here in the image. We specifically want the lower one, under "Specular".
Normal


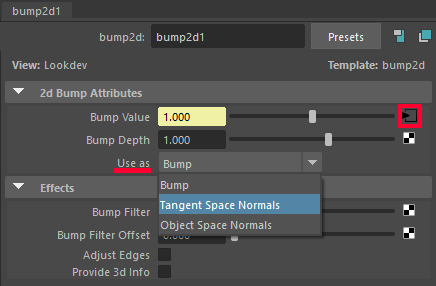
This property is located towards the bottom of the material. For the Bummp Mapping option, click the checkerbox on the right hand side, then select File in the window that pops up.
This also has a second property we need to change. In the second view that should pop up, change "Use as" to "Tangent Space Normals".
Once set, click the arrow next to Bump Value to proceed to the normal file selection screen.
