3D Animation - Pendulum Assignment
LEVEL 1 - Your First 3D Animation Exercise
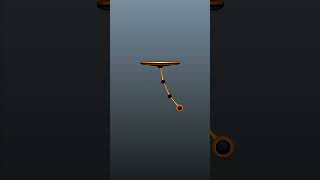
Level 1 Pendulum - Animating a Basic Pendulum in 3D
Before starting this exercise, we recommend you're first familiar with the First Steps in 3D Animation.
This page will walk us through how to move a pendulum arm so that it seems to sway back and forth infinitely. This loop will happen over the span of 2 seconds (48 frames total).
NOTE: This entire exercise can be accomplished by only adjusting the "rotate" value on the pendulum arm segments.
No other control adjustments are necessary!
Step 1: What is the Pendulum Exercise?
First, we should probably understand what this exercise is.
This exercise is briefly covered in a video linked on the First Steps in 3D Animation page. However, we can also watch the below video, which specifically describes how this exercise works in relation to 3D.

If the exercise is still not clear, here are some additional quick breakdown and example videos, plus there are additional tutorial videos at the bottom of the page.
Step 2: Character Controls
When we animate a character in 3D, we use what are called controls to animate. These are the thin "colored lines" that we see around our characters. Often they're shaped like circles, but they can come as squares or arcs or all sorts of other shapes.
If you want additional information, see the below video (from roughly 7:15 to 8:41):
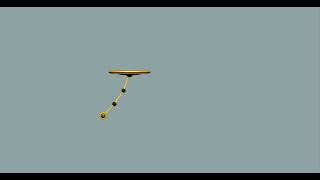
Also note that these controls come in all sorts of colors. The exact chosen colors will vary depending on the studio that made the rig, but most commonly we have:
-
Blue for character left.
-
Red for character right.
-
Yellow for character center.
Last Thing: Before you even think of animating a single keyframe, it's strongly recommended to experiment with your character's controls, anytime you have a new character. Even 5 minutes of experimenting can go a long way.
So with that in mind, before you go any further, open up your pendulum and see what the controls can do.
Step 3: Getting Familiar with the Timeline Editor
In animation (both 2D and 3D), we have what are the "primary poses" or "keyframes".
These are the primary, often "most extreme" or "most important" poses that make up your animation.
With these and nothing else, you can often get a good general idea of how your animation will look and feel.
To work with these keyframes, you will have to work with your respective software's timeline editor. Watch the below videos to get familiar with the timeline in your respective software, or try googling if you're using some other software than Maya or Blender.
Step 4: Your First Keyframes
With all that introduction stuff out of the way, we can finally start on our Pendulum.
Reminder that when we animate anything, we set keyframes on the controls of our object, not the object itself!
And reminder that in this example, we're going to move a pendulum arm so that it seems to sway
back and forth infinitely.
For initial setup, I set my timeline editor so that we are only looking at the first 48 frames,
aka two seconds of animation.
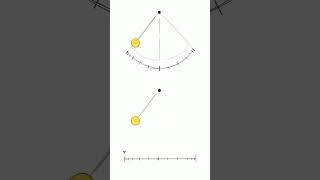
Once the timeline editor is set, we start by making exactly three keyframes total. To do this, we grab the three controls and:
-
Rotate the controls such that our pendulum arm is moving to the left. This can be at our default, "first pose," aka our starting location for this animation.
If you're struggling, it might be best to work from the top to bottom, one control at a time. Generally speaking in animation, you want to deal with the controls that have the "biggest impact" first, and gradually get move to the controls with "less impact" second.
And note that each control has its own set of keyframes. So you'll have to keyframe each one of these arm controls before moving to the next pose.
-
On a different keyframe, we can then make our second pose.
This will be the "extreme" pose of our pendulum arm moving to the right. So we rotate our pendulum arm controls to the furthest right we want it to go, and set a keyframe for each.
-
Finally, we can go set a third frame, which will bring our pendulum arm back to the starting location.
Once we're done, we should have three separate keyframes that should look something like below.
Step 5: Dealing with Timing
At this point, we have our first poses. But depending on where you put the keyframes, our timing might be all over!
If you haven't yet, try playing your animation now. It probably looks really weird! Don't worry, we can fix it pretty easy.
Reminder that each of our 3 controls should have 3 keyframes by now:
-
First Keyframe - Our first pose, with our pendulum facing the very left.
-
Second Keyframe - Our second pose, with our pendulum facing the very right.
-
Third Keyframe - Our third pose, with our pendulum going back to the very left.
We can easily fix our timing by doing the following:
-
First Keyframe - Move to frame 1, which should be the very first frame of our entire animation.
-
Second Keyframe - Move to frame 24, which should be the middle frame of our entire animation.
-
Third Keyframe - Move to frame 48, which should be the very last frame of our entire animation.
By such a simple change, we should now have something that looks like below:

If yours looks different, double check that you moved the keyframes on ALL the controls for your arm.
Beginners will frequently only select one control, see and move those keyframes, and then forget to do the same for the remaining controls.
Step 6: Getting Flexible
At this point, you might look at it, think it looks done, and pat yourself on the back. Right?
You got this far, good job!
...Except there's a major problem that any professional animator will point out right away. Look at the below two examples. Can you guess what it is?
The top one is what we have at the end of last step.
The bottom one is what we'll have at the end of this step.
End of Last Step:
End of This Step:
It can be a bit subtle to the untrained eye, but did you figure it out?
Basically, the problem is that our animation is currently a bit stiff.
It's very uncommon for things to move uniformly, all at once. Generally, only robots and man-made machinery move like that. Otherwise, most things move more fluidly, with more separation between parts.
Aka, in this case, we need to separate our segments of the arm, so that each segment of our arm moves differently than the other segments. In other words, we need to adjust the segments, so they aren't all moving at the same time.
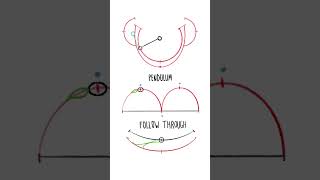
For more explanation, see "Follow Through" in our Principles of Animation .
To do this, we can delay our keyframes a bit for each segment of our pendulum. We'll go segment by segment, starting with the one at the very top.
-
First (Top) Segment - This top one can stay as-is, as it's the very first one. The "origin point" if you will. All other segments will be adjusted in relation to this one.
-
Second (Middle) Segment - For our next segment, we can take all our keyframes and delay them by two to three frames. That way, it lags behind our top segment juuuust a little bit.
In other words, we can select all the keyframes in the second segment, and move them to the side by two to three frames.
-
Third (Last) Segment - For this segment, we want to have it lag behind our second segment.
One again, we can select all keyframes in this segment, and then move them over. But this time, we move them an additional two to three frames more than the prior segment.
In other words, if our second segment was delayed by two frames, we delay this third segment by four. If our second segment was delayed by three frames, we delay this third segment by six.
If done correctly, it should look similar to below.
(You might have it looking glitchy/jumping where it loops. Don't worry about that yet, we'll get to that)
Step 7: The Graph Editor
To go any further, we need to discuss The Graph Editor.
Pretty much any 3D software will have a graph editor. And while this page will refer to Maya's graph editor, note that the graph editors in most 3D software largely function the same. You should be able to generally follow along, no matter what software you're using.
We can start by watching the below video, which provides us the basics of what a graph editor is, and how it works.

Hopefully after watching the above video, you have a good idea of what the graph editor can do.
And as the video said, don't think of it as "math."
Instead, think of it as a visual tool to help you understand what your animation is doing.
So what do we want to do with the graph editor?
Well first, we should check to see what's going on with our graph editor right now. And note we will get a different result, depending on what control we grab.
Graph Editor with the Top Control Selected:

Graph Editor with the Bottom Control Selected:
As you can see, we have curves that change based on which control we select. This is in large part because we delayed our segments in the prior step. Notice how the bottom control graph is slightly shifted to the right, compared to our top control.
Note that, because of this shifting, our top controls have keyframes on the first and last frame.
However, the keyframes our second and third controls are shifted over, so we don't have anything
at the first and last frames.
This can make it hard to adjust our graph editor in the next steps. So we want to make a keyframe for all our controls on the very first and very last frames.
(Or in the case of this example, I did frame 0, which is the frame before the "first frame" of our animation, and then frame 49, which is the frame after the "last frame" of our animation. Either option works. Keyframe on 1 + 48, or keyframe 0 + 49)
And note that at this point, we don't change our animation on these frames at all, we only make sure a keyframe exists.
The end result should look like below. Not much different, other than we have additional frames that aren't doing anything yet.
Step 8:
At this point, we can experiment with the graph editor to see what we can do.
But to do that, here's a quick demo of how we're going to interact with the graph editor for now.
In any good graph editor, you can click on a keyframe and get little lines that come out of the left and right side. These are called tangents, and moving them around lets you change the arc that connects your keyframes.
Each of these arcs represents the In-Between frames (or inbetweens) that our software automatically generates from keyframe A to keyframe B.
Note that, depending on your software, these tangents might be "locked" by default. As in, they have a fixed length and you cannot change it without changing some settings.
In Maya, we fix this by right-clicking our keyframe with it selected, then selecting "Weighted Tangents."
Now that we can manipulate our graph editor, let's actually experiment.
To keep it simple, for now we'll only worry about making our arcs bigger or smaller.
And note that while the example only shows one control, we're actually doing the same thing to
all controls in our pendulum arm, for maximum effect..
NOTE: In the below examples, this going to completely mess up the point where our animation loops. So the left side of our pendulum is completely hidden for the moment. It's okay, we can get a good idea from only watching the right side and our graph editor.
Example of making our Arcs teeny tiny.
Here, we adjust our arcs to make them really small on all our controls.
The effect is that our arm seems to spend more time in the "swing", where it's actively moving.
It can make our arm look like it's hitting an invisible object and suddenly changing direction.
Example of making our Arcs Big.
Here, we adjust our arcs to make them really big on all our controls.
The effect is that our arm seems to spend more time at the extreme poses, giving more of a sense of weight and momentum shifting at top of the swing.
This is probably what we want, so we will use this for our next step.
Step 9: Correcting Our Loop
In the last step, we adjusted our graph editor to have larger, wider arcs.
When our pendulum swings to the right, it looks good. However, when it swings to the left, it kinda...explodes. But why?
This is actually due to the keyframes/arcs for the starting frame and the ending frame not matching up.
Basically, anytime we have a looping animation, we want the end keyframes to transition nicely into the starting keyframes. We can use the graph editor to visually see how this transition is going.
We can add and remove keyframes to be able to easier manipulate this transition (like we did back in Step #7, above).
Basically, we want to adjust your graph editor arcs so that the curves going into the last frame of our animation (frame 48 in this instance) roughly match the curves coming out from our first frame of our animation (frame 1 in this instance).
So to finish our animation and get the results shown below:
-
Modify our bottom curves (which represent the left-side of our pendulum in this case) to be wider, so that the left side "feels" about equivalent to the right.
-
Adjust our curves going into frame 48 to roughly match the curves coming out of frame 1.
-
Add or remove frames as necessary, to achieve the above two points.
Remember: As a general rule with keyframes, less is more! Only add new keyframes when you have a clear reason for it. Try to avoid adding keyframes willy-nilly, as too many frames can make our animation seem messy and be hard to adjust in the future!
Final Animation, with Top Control Selected for Graph Editor:

Final Animation, with Bottom Control Selected for Graph Editor:
Closing Thoughts and Next Steps
Closing Thoughts
That's it for this exercise!
You've completed your first animation!
You should be proud of yourself for getting this far!
If you struggled with this at all, it might be a good idea to go back and do it again from scratch! Can you do it again without having to reference this page?
If you can, then you probably understand these concepts enough to move on!
Otherwise, there is often value in redoing exercises, particularly when it comes to animating 2D or 3D objects and characters! Animation a complicated topic, and you'll only improve with practice.
Next Steps
If you're all done, and you don't want to repeat this exercise (We highly recommend repeating it at least once. Seriously!), then you can move on to the following:
-
Go back to Principles of Animation.
We covered:Straight-Ahead / Pose-to-Pose
Follow-through / Overlapping Action
Slow-In/Slow-Out
Arcs
Timing
Can you identify where and how we used each of these? Do you remember what each one is?
(Hint: Some of these were handled automatically by the computer software. But we still interacted with all of them!) -
Move on to the Bouncing Ball assignment.
-
Try the Level 2 Pendulum assignment.