3D Animation - Walk Cycles
How to Create Solid Walk Cycles in 3D
Tutorial: First Walk Cycle
This tutorial assumes a 24-fps full cycle. That's 12 frames per half of the walk.
Setup
Step 1
Before we do anything else, we should set up a model that's fully rigged.
For this example, I used a model from the free
Blender "Animation Fundamentals" tutorial
.
The model used here doesn't really matter, as long as it's a model you're happy with, and it's fully rigged, at
least for general body movement.
Step 2
When you import your model, reminder to do your animations in a separate file than you made the rig, then link the two files together. That way, you can update the model/rig in the future if needed. To do this:
-
Maya: Use File > Reference
-
See https://www.youtube.com/watch?v=vvRcND4zNY4 for visual example.
-
-
Blender: Use File > Link. Then with the linked model selected, use Object > Relations > Make Library Overwrite.
-
See https://youtu.be/WDpYKvhSOYI?si=idTCkh2mR6e9pK8m&t=175 for visual example.
-
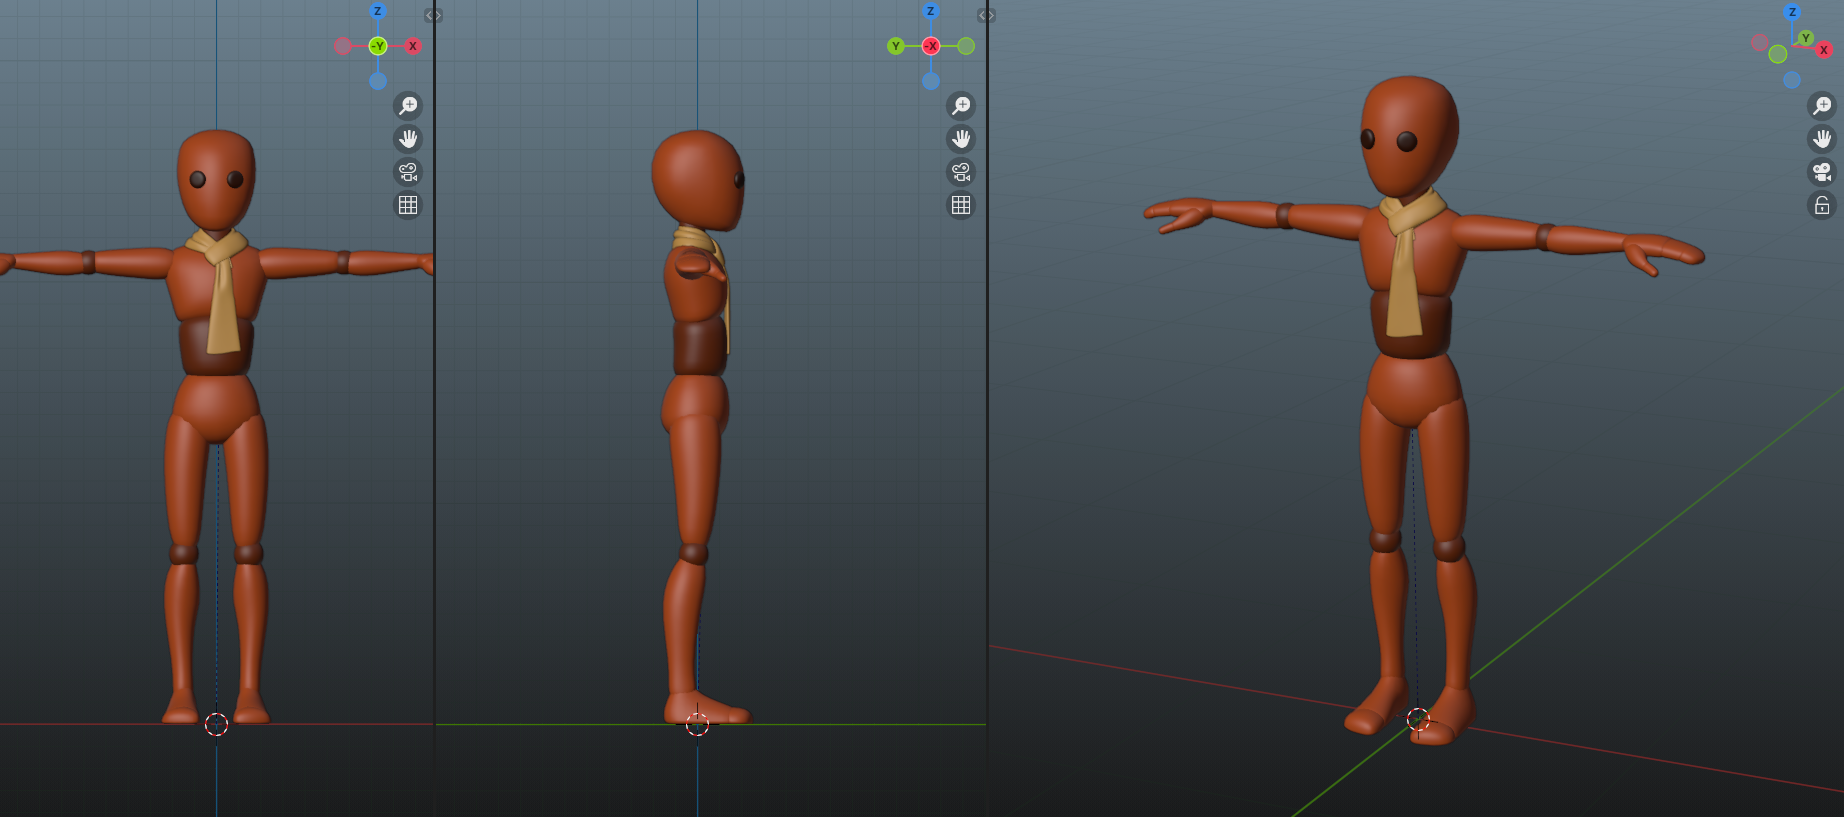
Also note how we have 3 separate views open of our character.
Generally speaking, it's a good idea to have 3 different angles open of your character for this:
Front Orthographic, Side Orthographic, and then some form of a 3/4ths view.
In my case, I prefer having them all side-by-side like shown. But you're welcome to stack them or arrange however you wish.
As you'll see below, I sometimes adjust the 3/4ths view as my "general viewport" as well. Hence it being slightly larger than the others.
Step 3
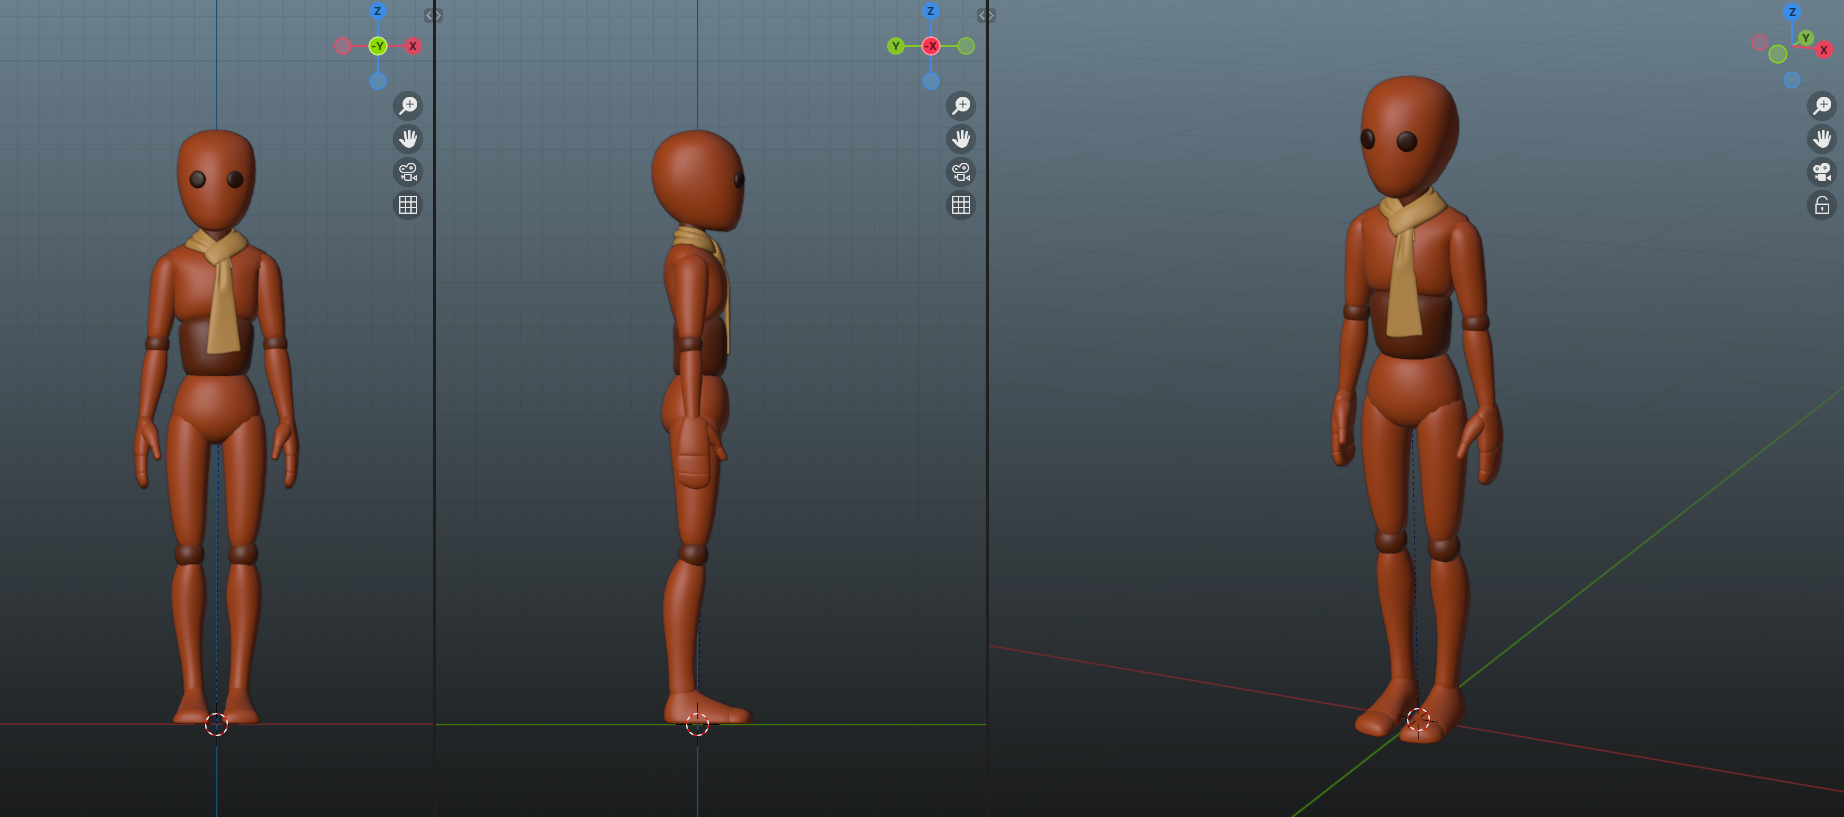
Below, we adjust our character from the standard T-Pose into a more neutral, natural standing position.
Note how close together the character's feet are here. They're intentionally pushed together.
The feet might almost be slightly too close together for a general standing position.
However, for a walk cycle, we want them about this close together, it makes it easier to start with.
Step 4
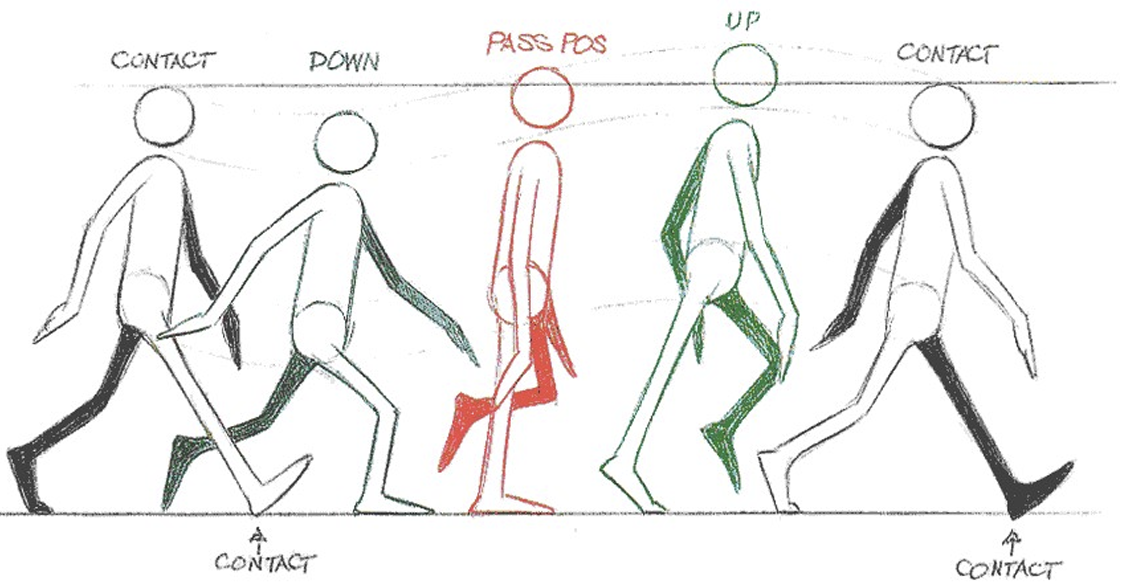
This next step is optional but highly recommended for those new to doing walk cycles.
Here, we get 2D reference of all of our major poses in the walk cycle. In this case, I'm using the most basic example from The Animator's Survival Kit" book, by Richard Williams . (This book is incredibly informative, and even acts as the "core book" for some animation colleges. Highly recommend reading it if you haven't already. It explains what these poses are and why we care about them.)
Aside from helping beginners, this is helpful if you already know how you want the walk cycle to look, and have 2D reference ahead of time. As you get better, it's personal preference if you use ref like this or not.
First Pass (Initial Posing)
Step 5
This is where we start actually doing animation. Horaay!
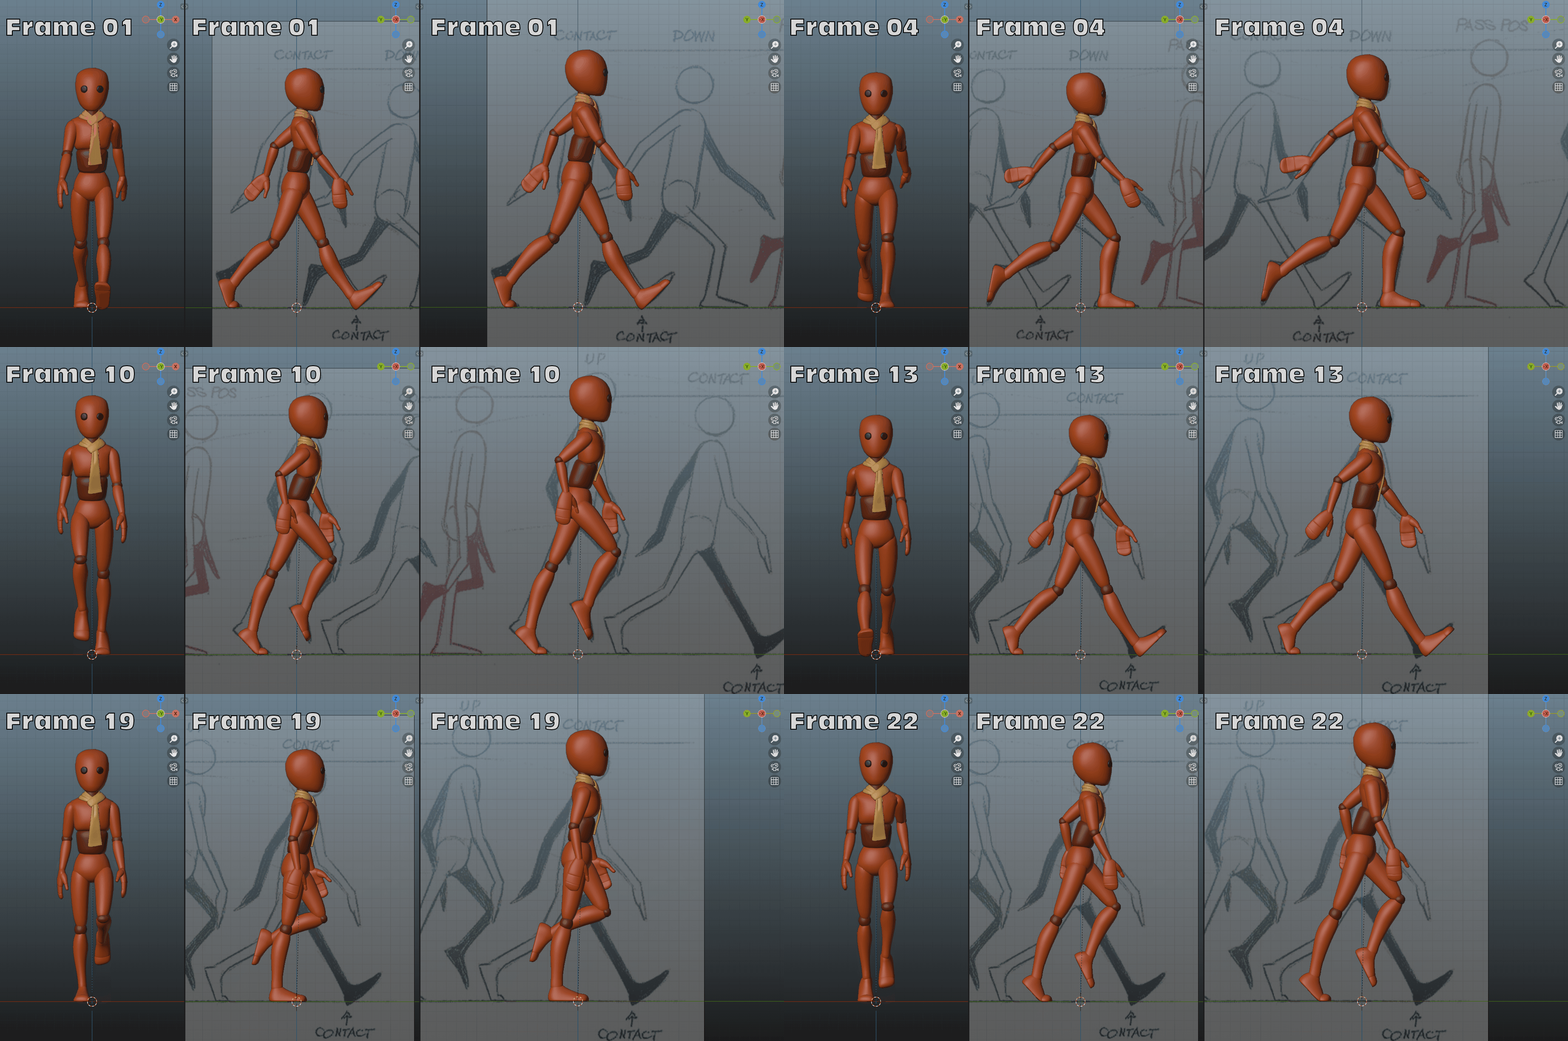
This part is pretty straightforward. Import your reference poses, line your character up, and start trying to match as best as you can.
The poses might not be an exact match, so do your best to get as close as possible.
For the moment, the most important parts to line up is the hips. If you can, try to generally line the head up
too. If the refs don't seem to be lining up well, consider adjusting the scale of your reference sheet and then
attempt again.
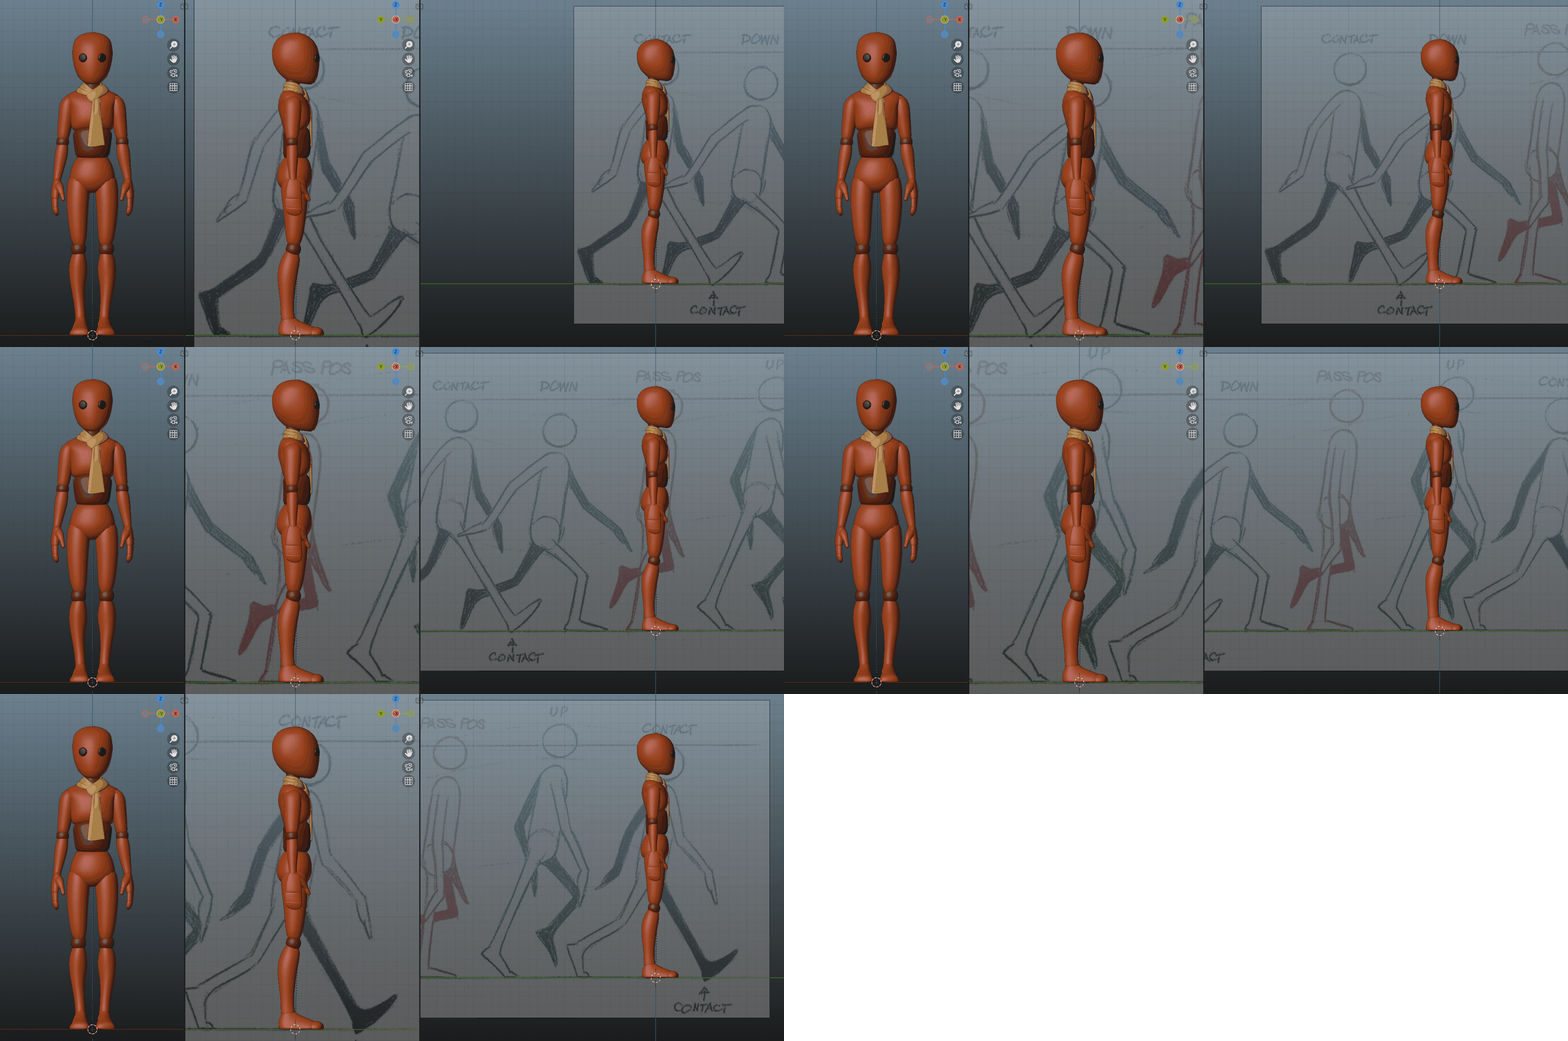
For simplicity, our cycle is going to be fully symmetrical.
Since we're doing a 24-fps cycle, we line up every 3 frames, starting with frame 1.
Frame 1 and 25 should match exactly. Frame 13 should be a mirror image of frame 1.
Step 6
With our reference sheet lined up on the desired frames, we can start posing the hips and feet.
Again, it might not match perfectly. But get it as close as you can. We can always adjust it later.
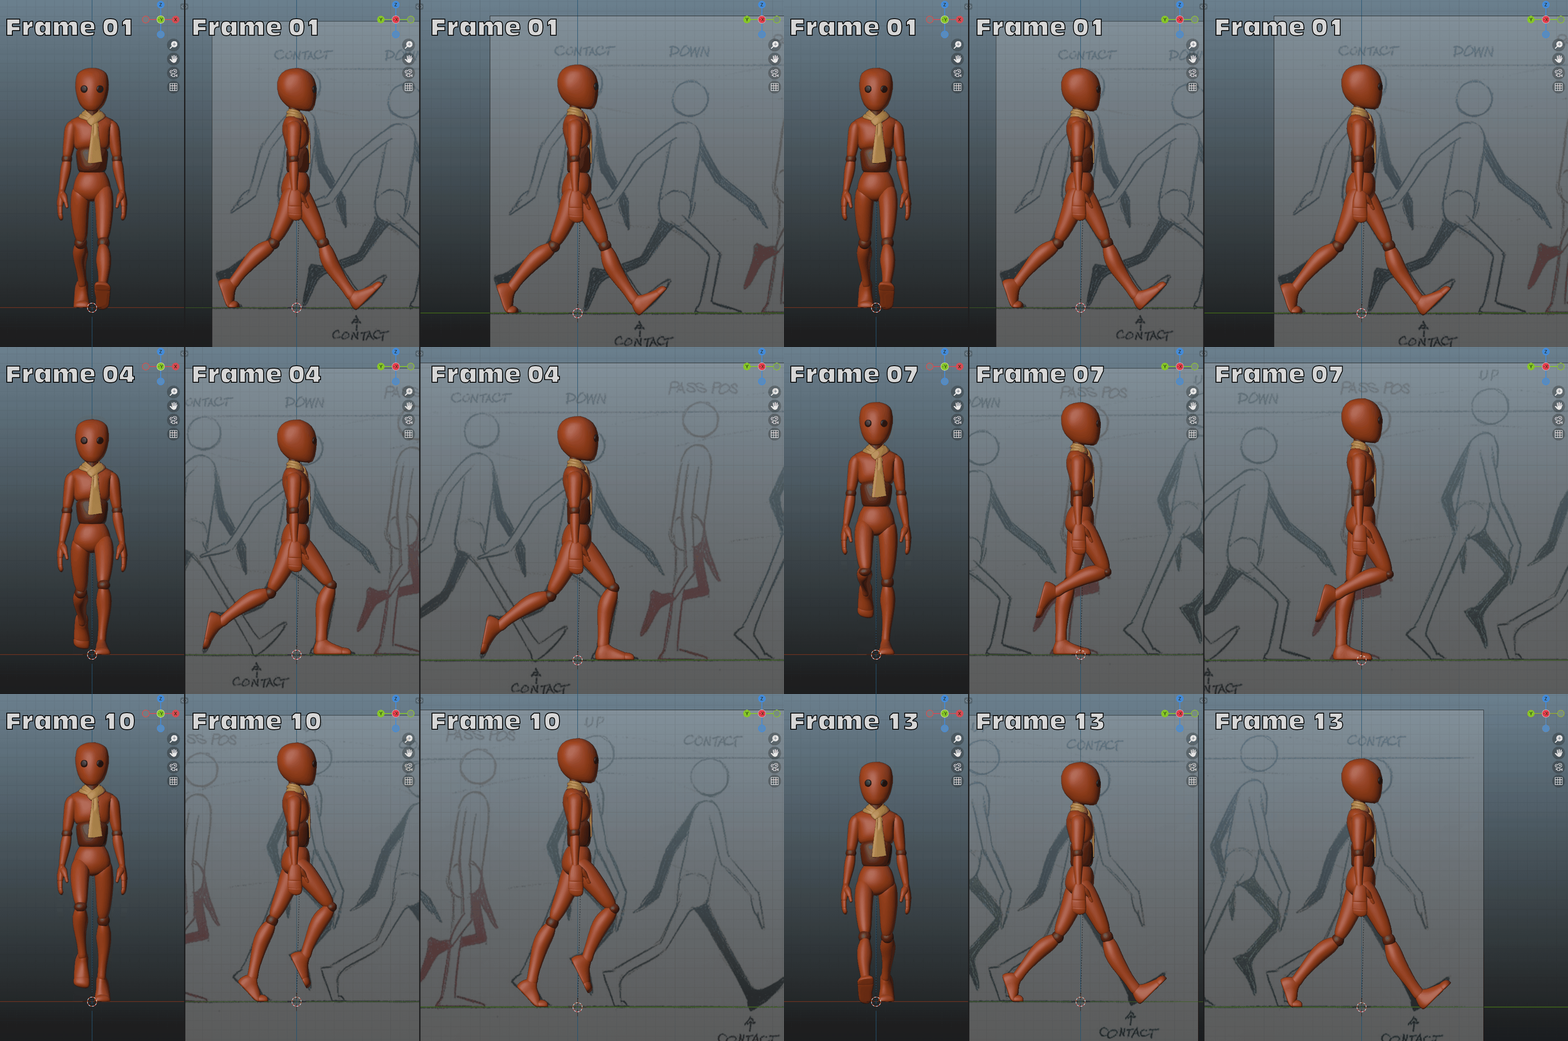
Step 7
With frames 1 - 13 finished, symmetry starts being a factor.
If your software supports it, the easiest way is to copy the original frames and paste flipped.
Otherwise, you need to do the same task with frames 14 - 25 (again, frame 25 should be identical to frame 1).
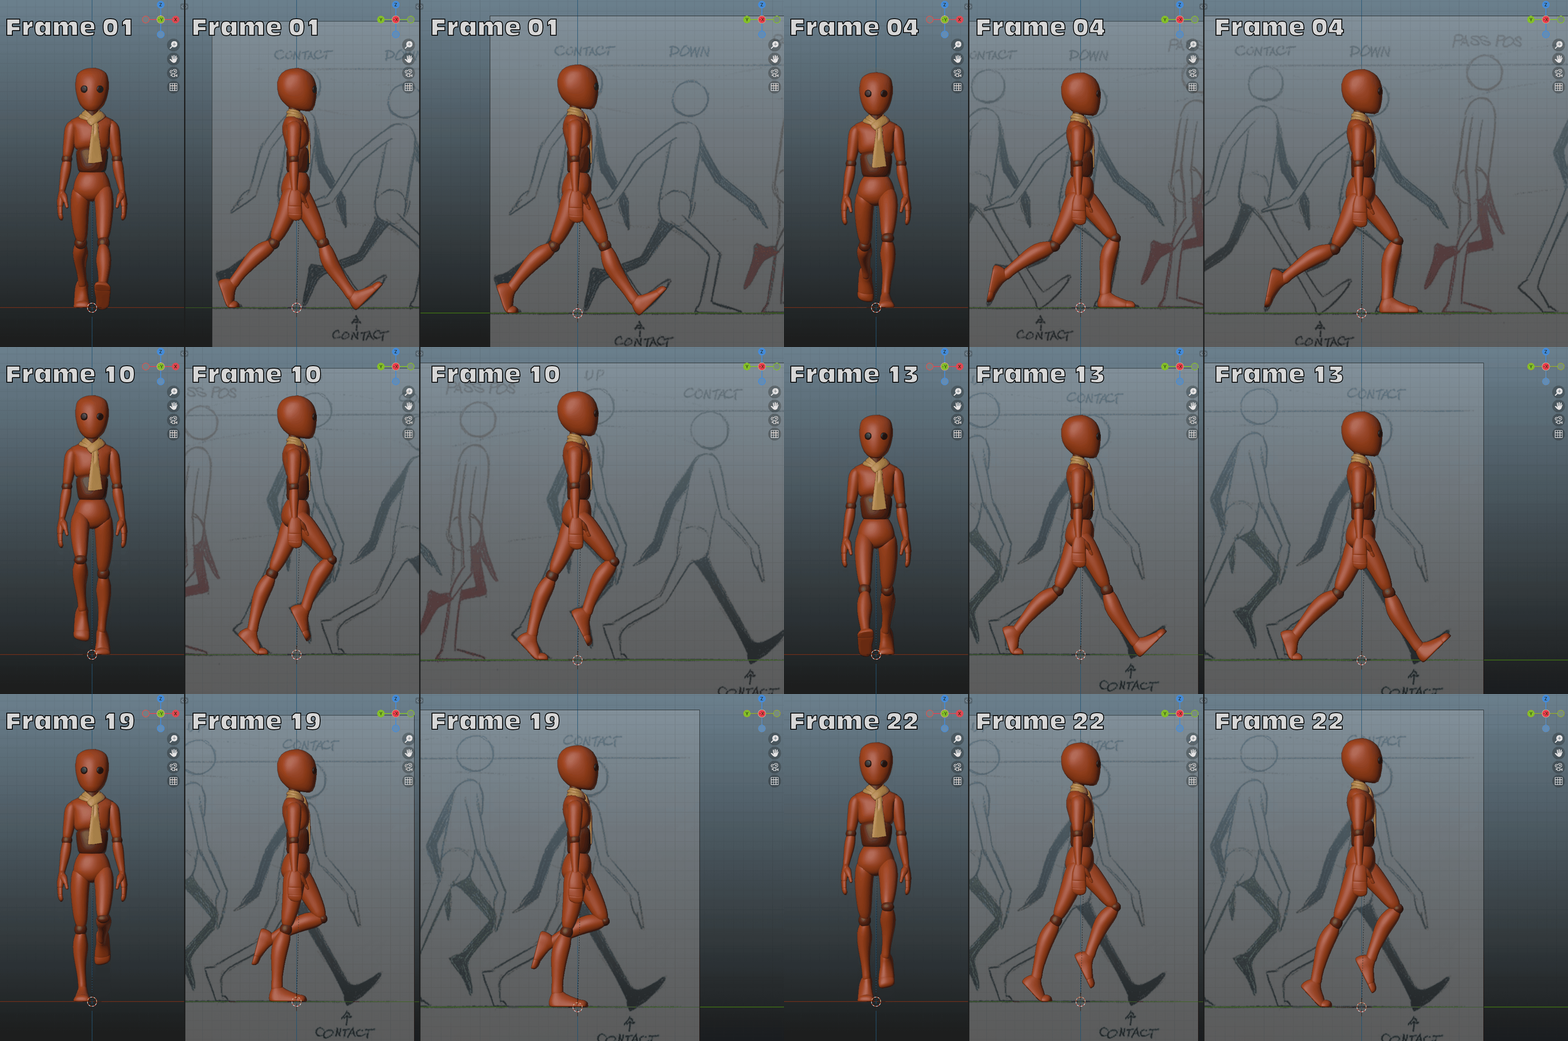
Look at that! Already coming along!
Step 8
With the legs looking good, we can start adjusting the chest and setting the general arm posing.
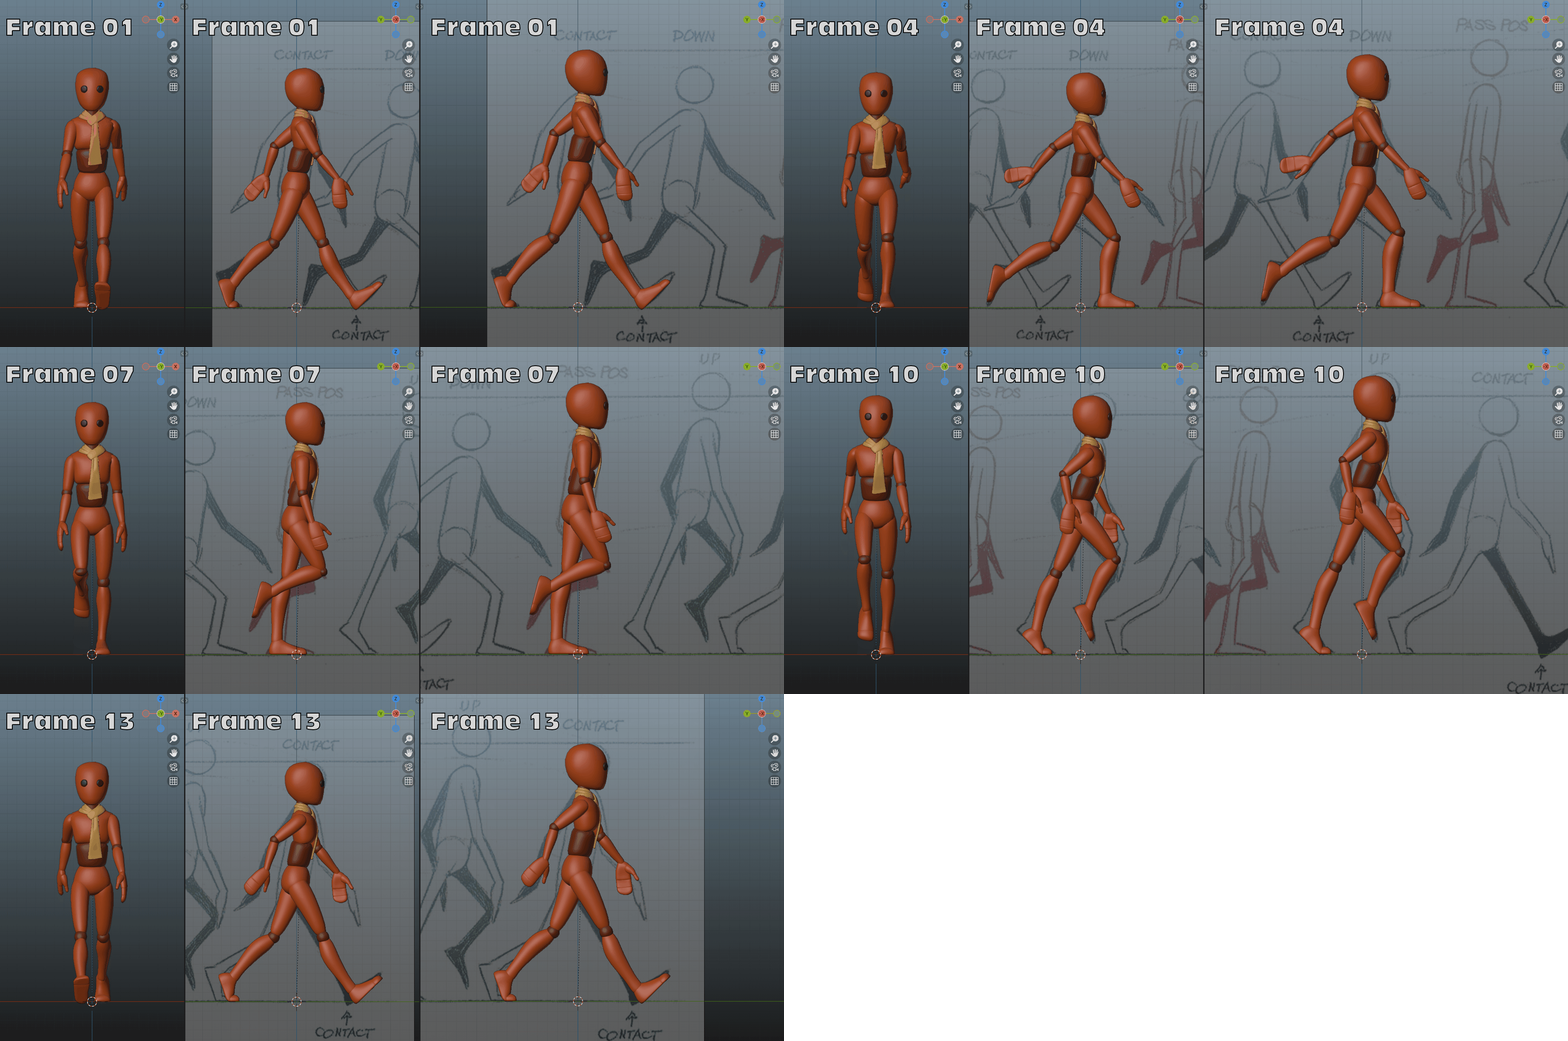
Step 9
Once again, after doing frames 1-13, we can "copy flipped" to frames 14 - 25.
Take a Breather
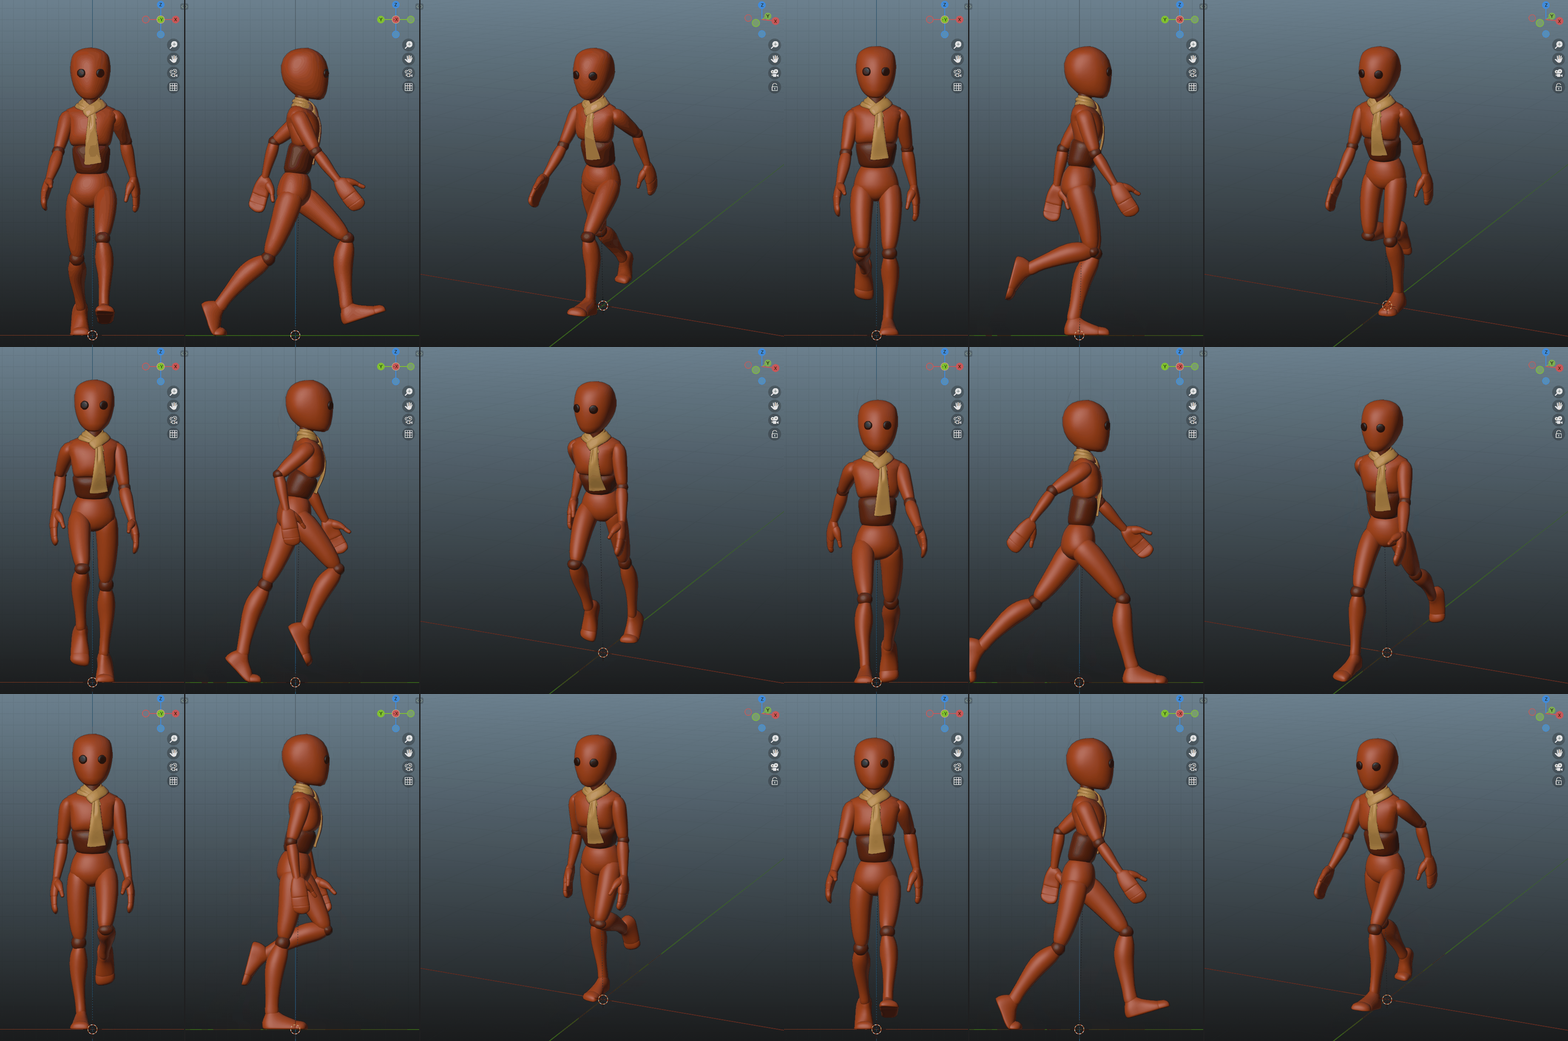
At this point, we can hide our ref and see how it looks in our proper views.
If this is your first time doing a walk cycle, then look at what we've done so far!
You've already made significant progress!
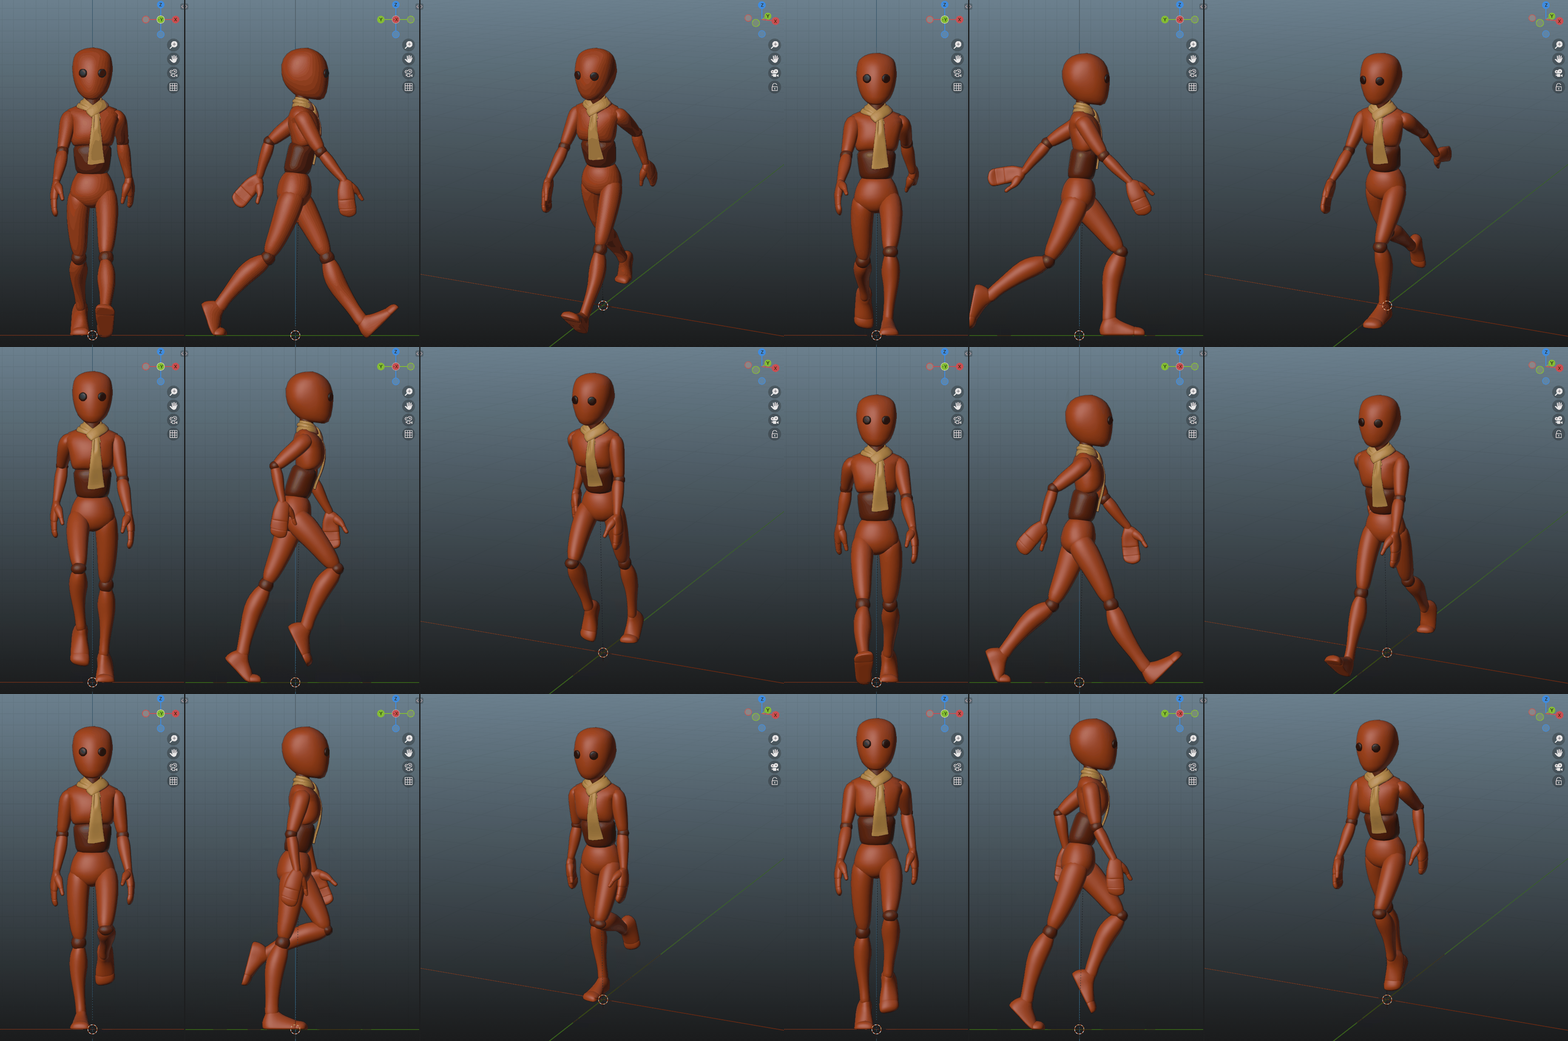
Here's the blockout of our walk, without any in-between frames.
And here is the same thing, but with our graph editor curves set to "bezier" (default for most software), so we can get some free in-between frames.
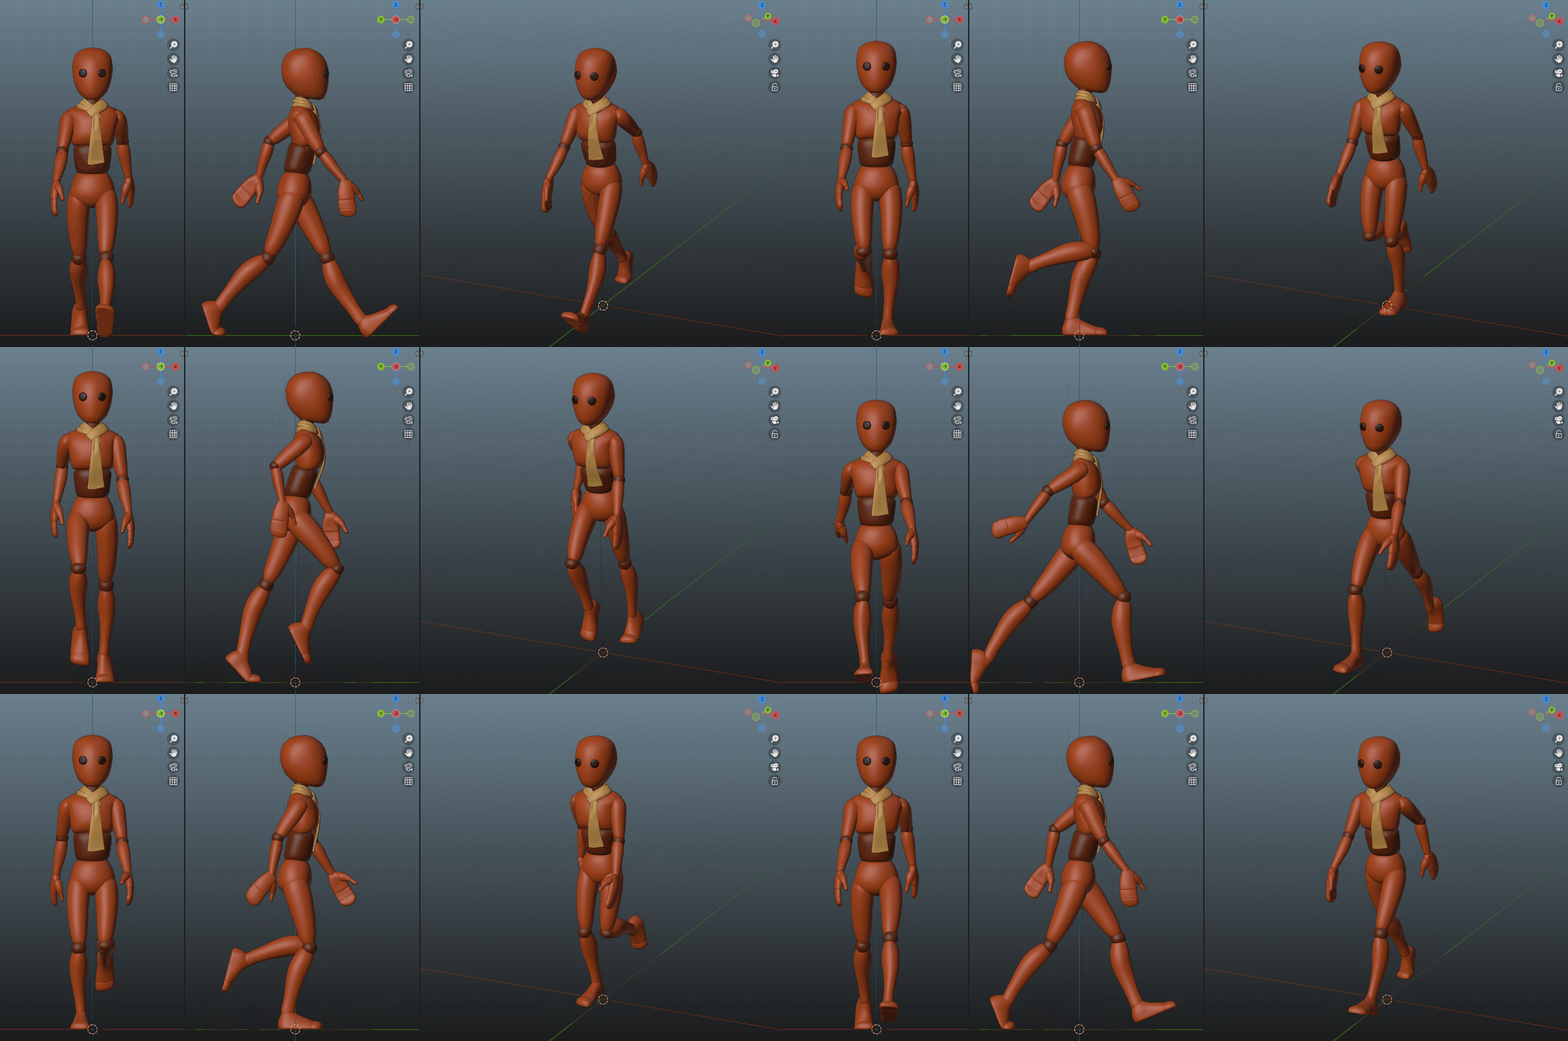
Awesome!
Second Pass
As mentioned, a walk cycle (or really any animation) should really be done in passes.
We can consider above to have been our "first pass," and each additional pass will provide refinement.
So don't worry if yours looks a bit janky, we're here to fix that!
At this point, it's not a bad idea to go back and remove any extra/unnecessary keyframes, if there are any.
Aka, if you have any rotation/translation/scale keyframes that aren't actually doing much, it can be helpful
to remove them now.
The less keyframes your animation has, the easier it is to work with. Furthermore, unnecessary keyframes can get
in the way of the automatic in-betweening that the software provides. You can potentially save yourself some
future headaches if you just remove the extra keyframes now!
(Reminder that you still want most rig controls keyframed on the first frame, so that auto-keying will take
effect!)
It's also worth noting that, from this point onward, what you do might start deviating from this tutorial.
It really depends on your character, the rig setup, and what kind of walk you're going for.
Hopefully by seeing how I tackle problems in this tutorial, it gives you ideas on how to approach your own walk cycle.
Step 10
With blocking out of the way, I decided to look at the center of the body. It looked muched too rigid.
As a general rule, you can rotate the hips (or preferably "Center of Gravity" [CoG]) in time with the legs.
For example, as the left leg steps forward, the left side of the hips also rotate forward.
As the left leg moves backward, the left side of the hips also rotate backward.
Keep this really subtle, maybe 1 or 2 degrees, a little goes a long way.
As far as when to keyframe, you can keyframe close to the extremes of the legs being fully forward/back.
By doing so, in-betweening will make the movement transition to the rest of your frames.
After you do this, your character's chest/neck/head will probably be rotating with the hips.
So we have to counter-rotate to try to combat this. Start closest to the hips and work your way upward,
until your character's torso looks like it's fluidly moving in time with the walk.
The goal here is to add "visual separation," so that our character doesn't look rigid and stiff, while still appearing to be walking straight forward. This "visual separation" is accomplished by adding natural movements to different sections of the body, so that our character isn't moving as one single rigid block.
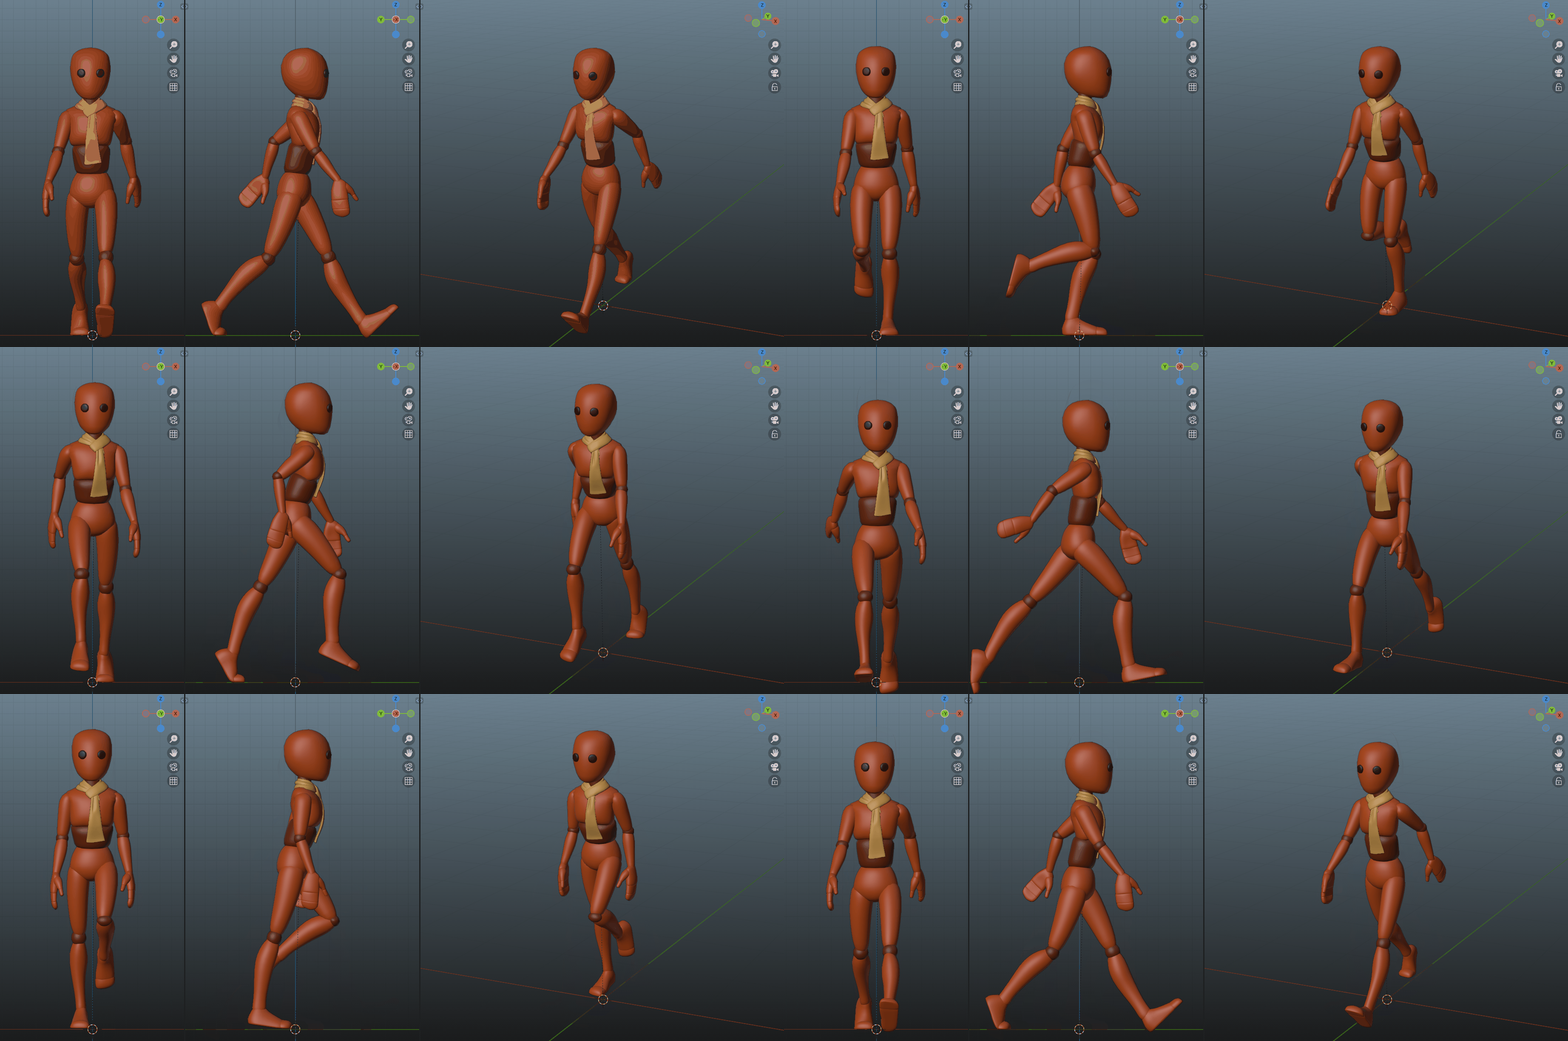
If needed, this is also a good point to adjust your hip bounce.
Your CoG (or hips if you don't have a CoG) should rise up during the "pass pose". This is when the feet directly
under your character.
The CoG/hips should fall otherwise, with the lowest point being when the feet are farthest apart.
Step 11
It looks good so far. But with the torso looking smoother, some issues have become more obvious.
First, I noticed an issue with the feet.
Specifically, when the back foot rolls to come up off the floor, it actually goes under the floor! Uh oh!
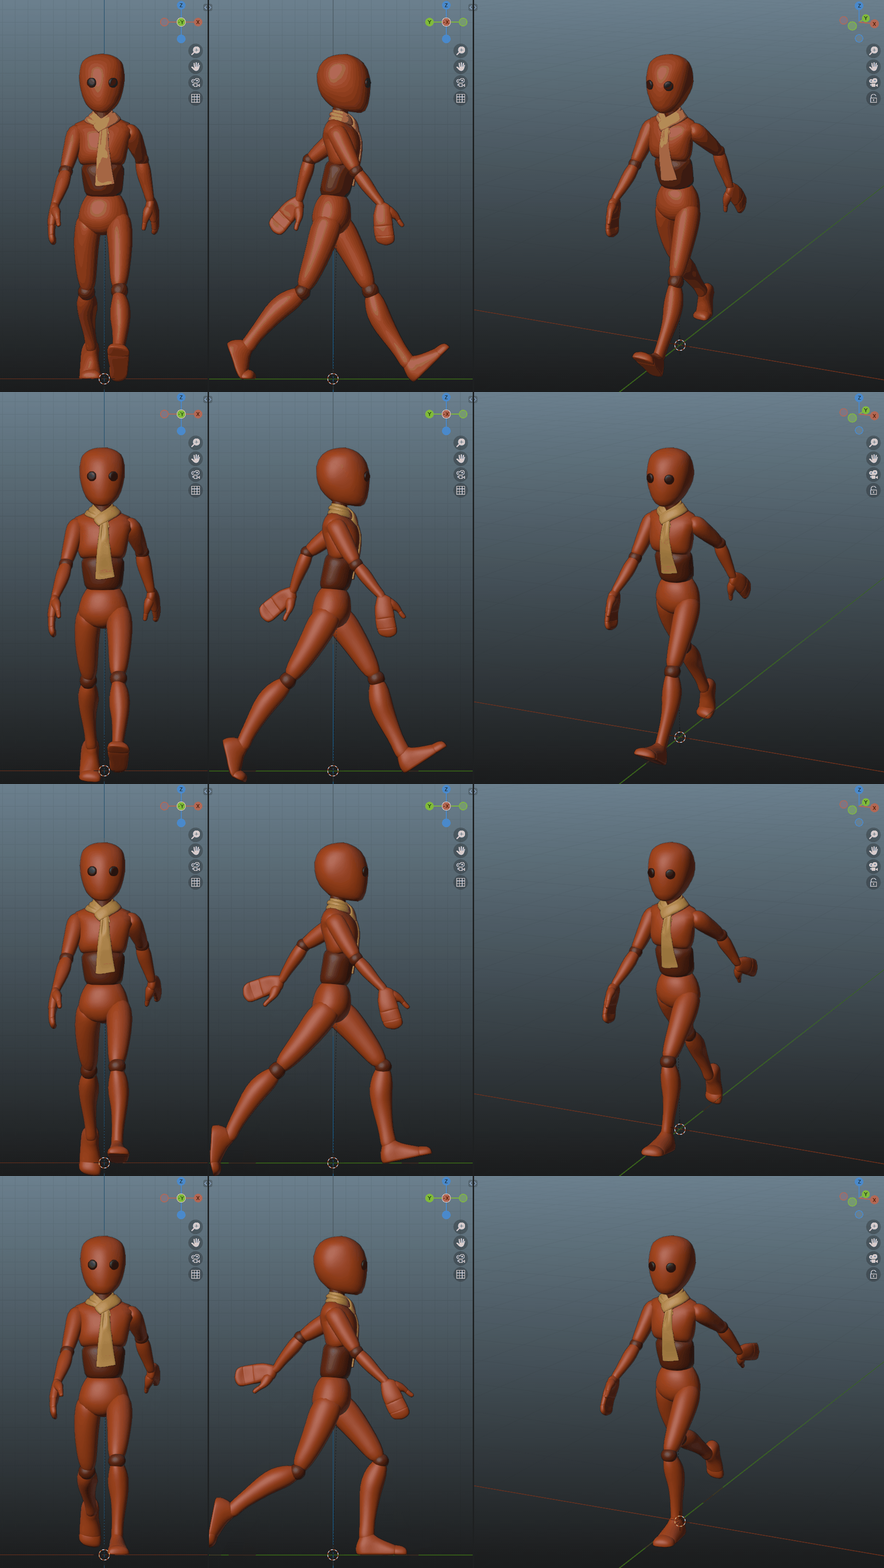
There's no magic here. Just have to add some keyframes to fix it and make the movement more natural.
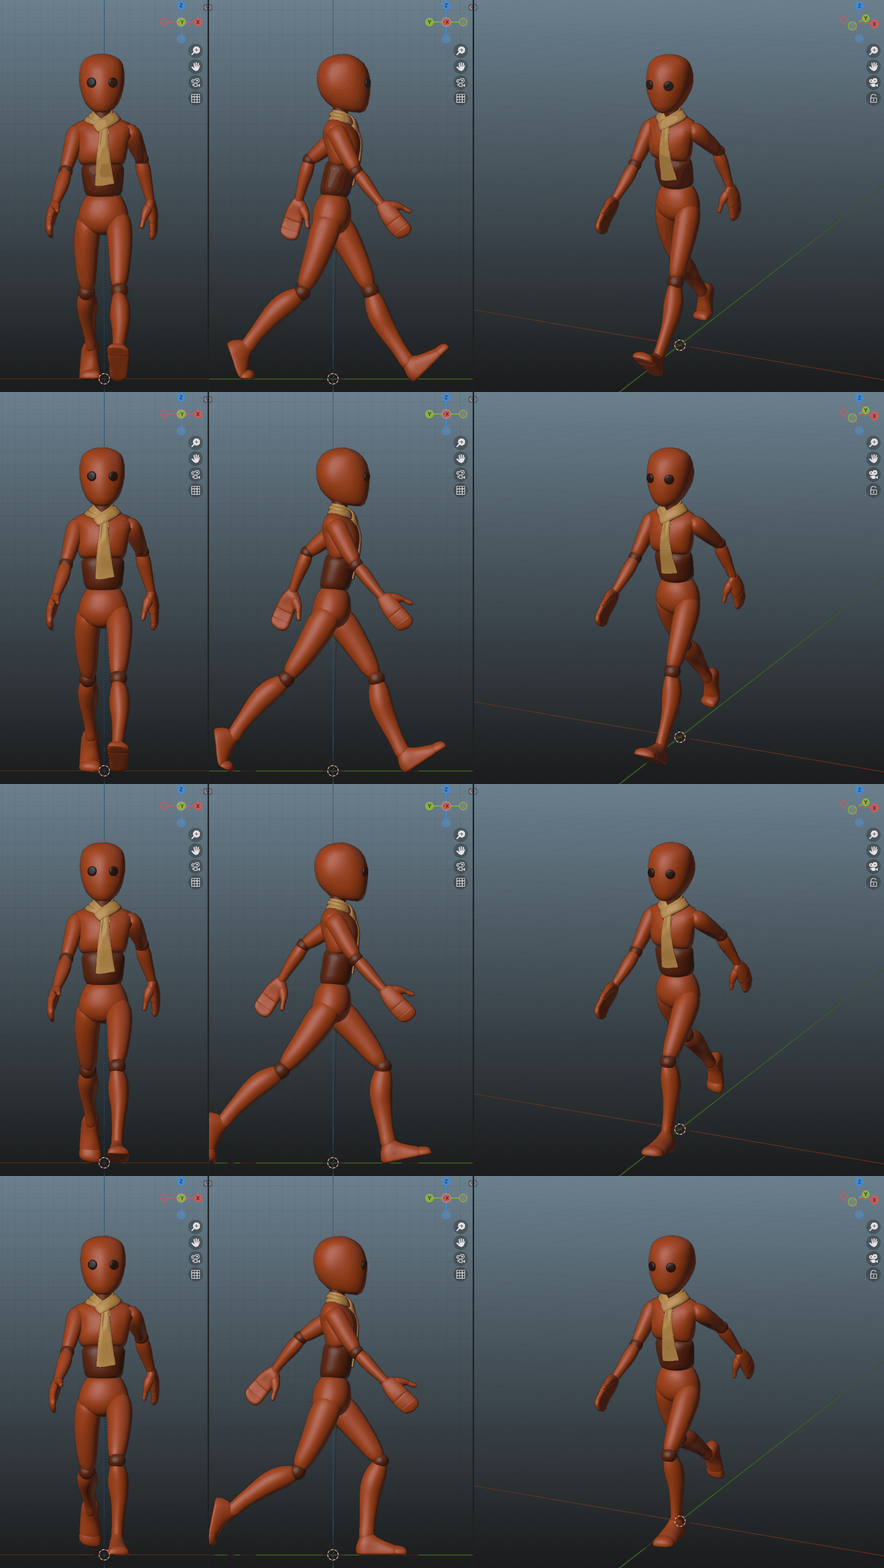
Step 12
I also felt like the forward-foot didn't have enough impact.
It felt a little bit loosey and floaty as my character placed his foot down.
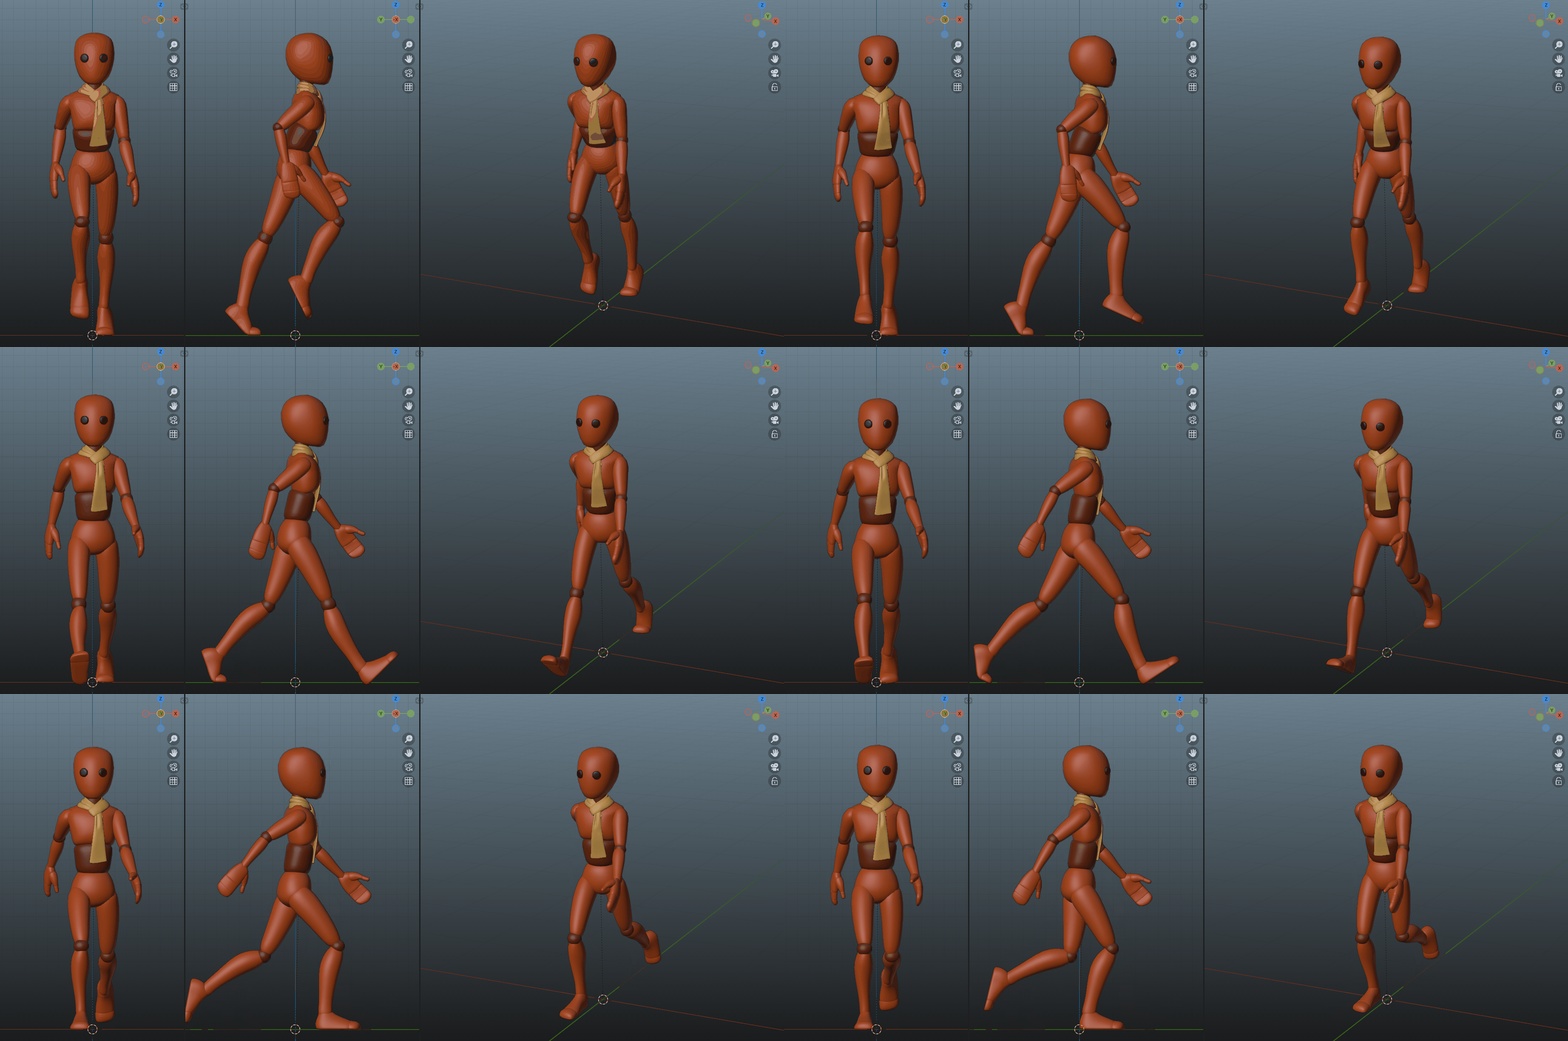
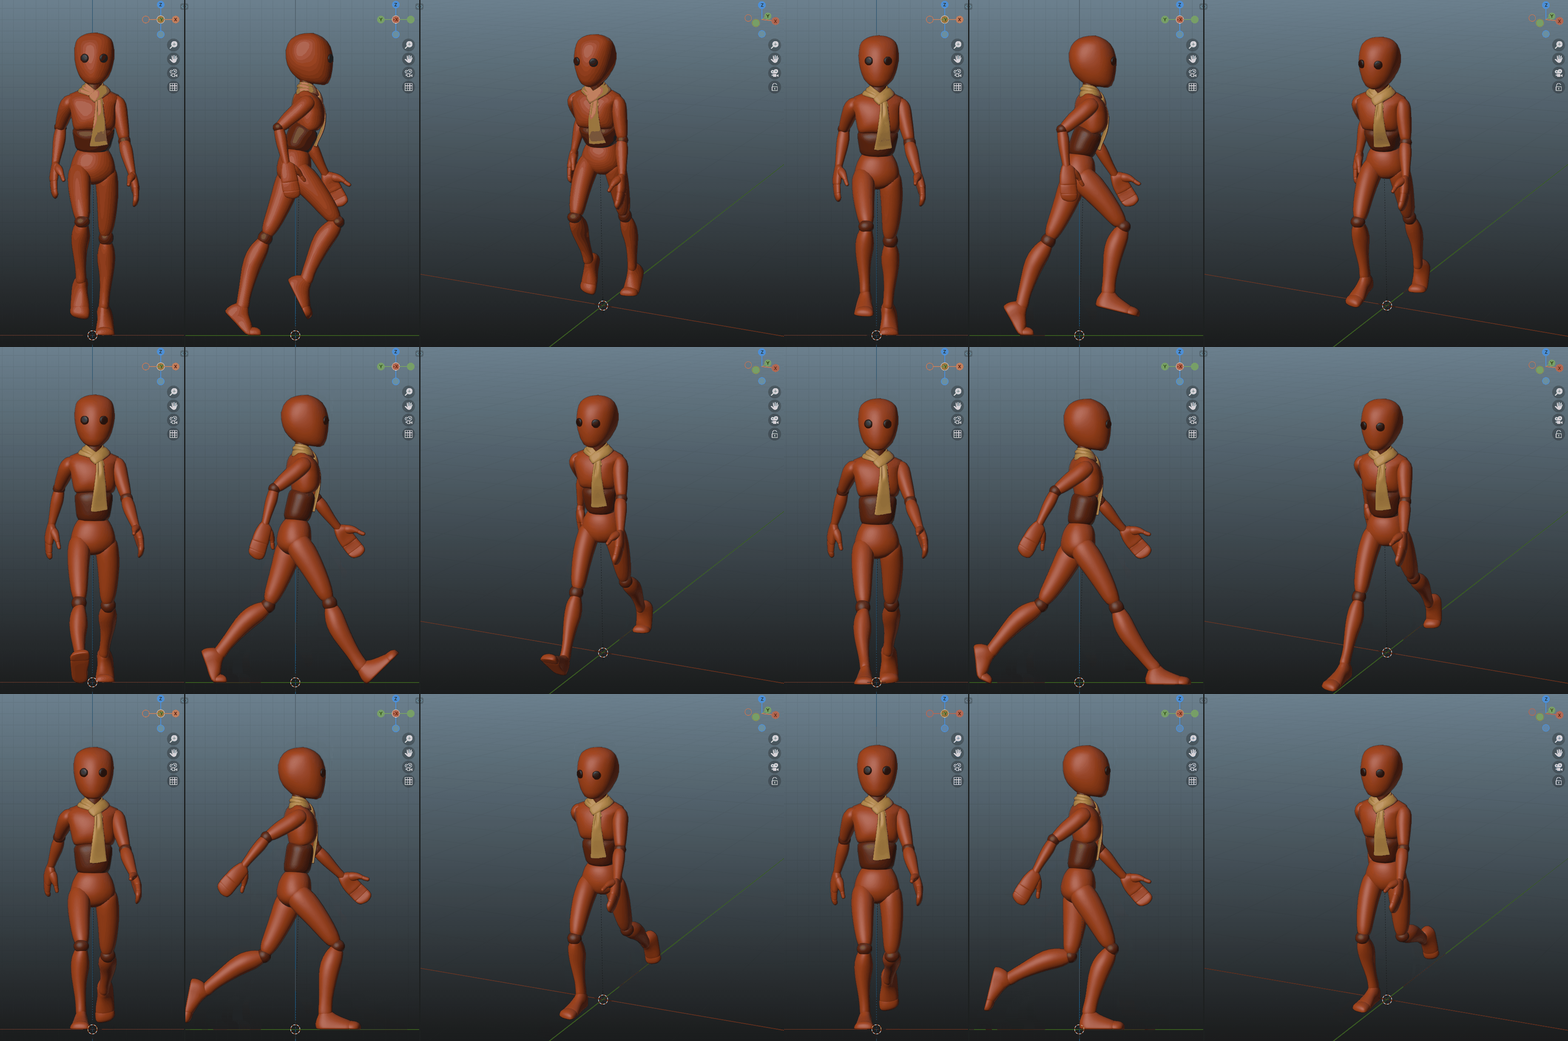
As you can see, the fix was mostly to make the step-down feel more intentional. More impactful.
I accomplished this by making the movement faster and more precise on the desired frames.
As we see later (Step ???), I maybe went a bit too far and now it's too fast, almost like my character is slamming
the foot down.
Pass 2 Complete!
With every pass, it's always a good idea to take a second to step back, look at your work, and even take a 5-minute break. Sometimes a short break away can help refresh your eyes, allowing you to see issues you didn't see previously.
Third Pass
Step 13
The arms were really bothering me, so that was the next thing I worked on.
For clarification, the arms weren't bad or anything. But they definitely could be more fluid.
As it was, they felt rigid and stiff. Look at the below image for what I mean.
To explain this one, I first want to show what I'm even talking about.
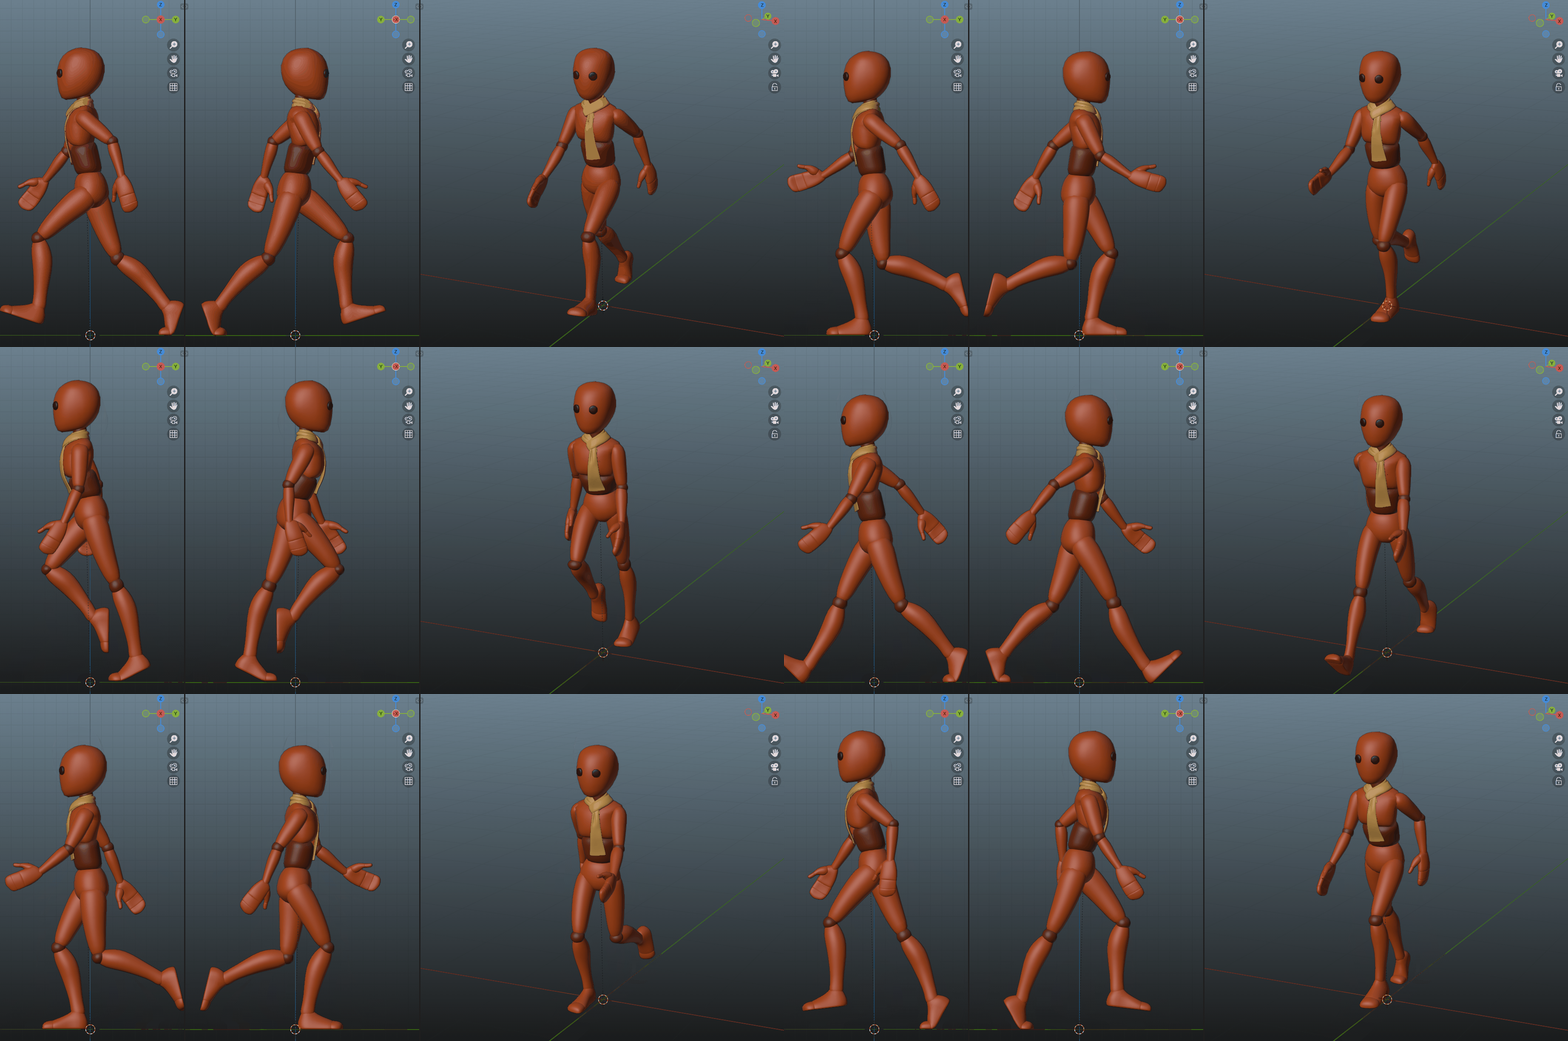
In the leftmost panel, the arm closest to camera shows how the arms moved previously.
In the middle panel, the arm closest to camera shows after applying the fix.
In the 3/4th view, the character's right arm (our left) is updated and fluid, while the character's left arm
(our right) is the old, rigid version.
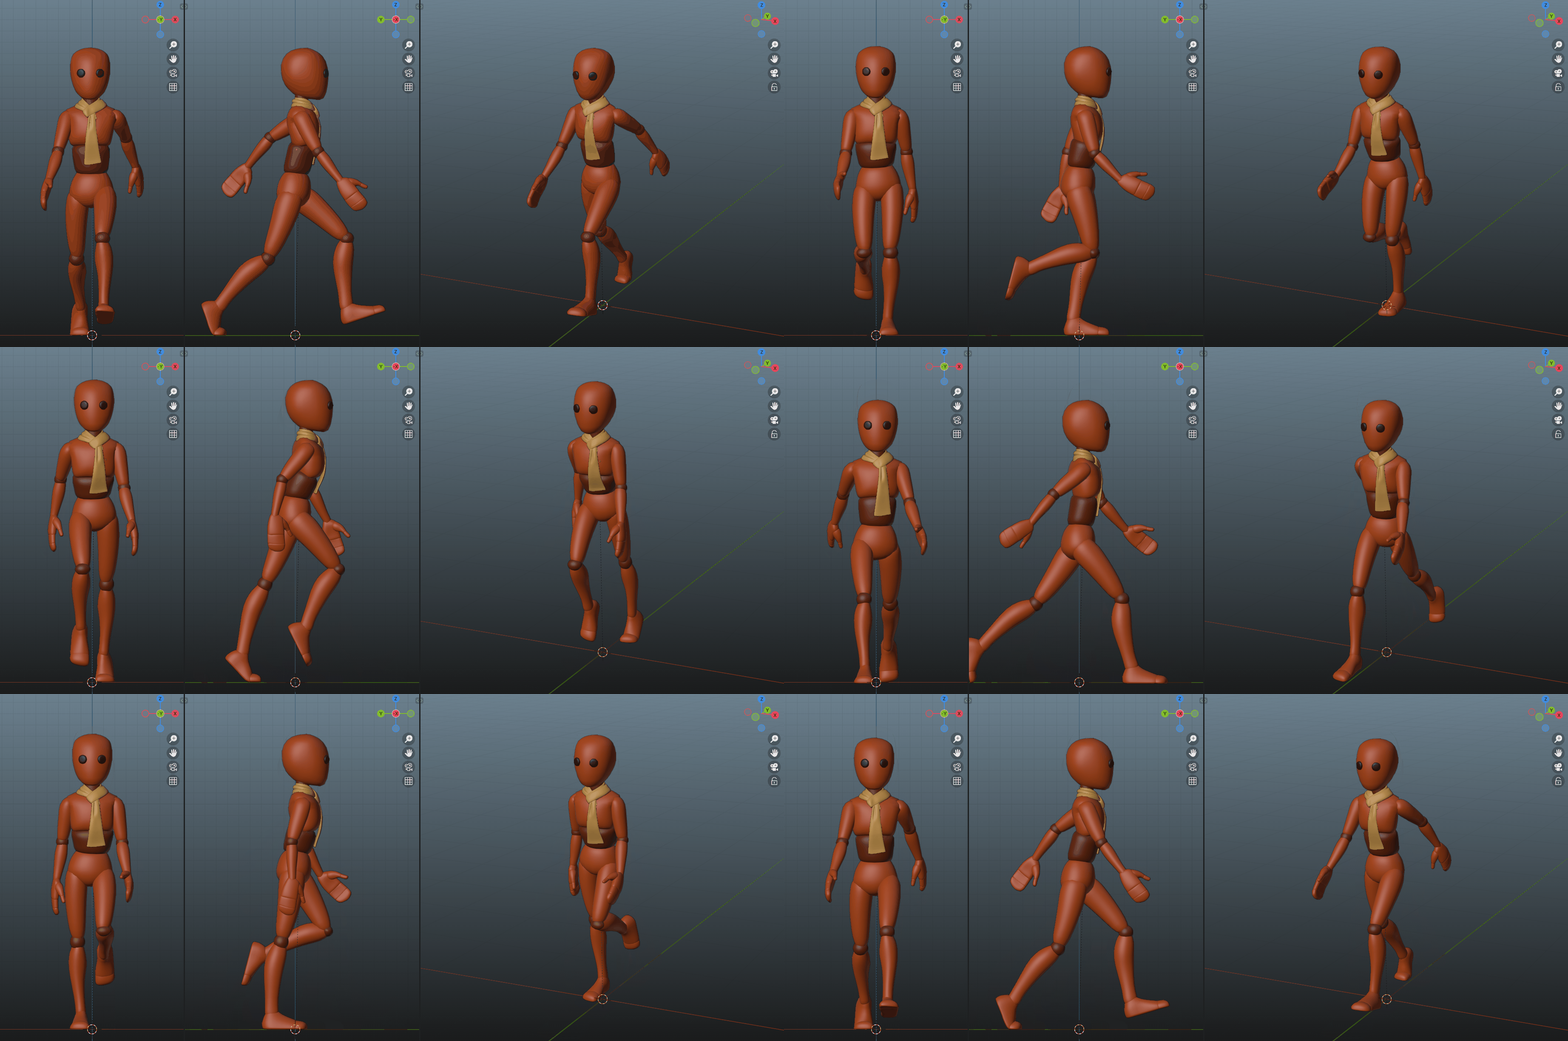
And below is with the fix fully applied to both arms.
Compare the below image to what we had at end of "Phase 2" to really see the difference.
So what actually changed?
Basically, the original poses for the arms didn't look 100% natural to on this model. At least with how I
originally interpreted them.
So I removed all frames on the lower arm and hand, and started over.
With standard walking arm movement, you really want it to be fluid.
Use FK so that you get natural arc movements.
And follow the pendulum exercise to give some realistic drag and overlap.
To put it more precisely:
-
Select the upper arm and find the frame when the arm is furthest forward, just before it starts moving back. Make sure you're happy with this positioning. Adjust if necessary.
-
Go to the very next frame. Aka the first frame where the upper arm starts falling back down. Select the lower arm control and rotate it upward, to simulate "air drag."
Basically, we're simulating the farthest parts of the arm "lagging" behind the parts closer to the torso. -
Repeat the same thing for the hand. Aka, step yet another frame forward, and have the hand/wrist lag slightly more than the lower arm.
-
The model for this example doesn't have fingers. But if your model does have fingers, you could go yet another frame forward and have the fingers lag slightly as well.
-
You can then find the place where the arm reaches all the way behind your character, and repeat the same steps for the transition of the arm starting to swing forward again.
-
Reminder to make sure to mirror (copy-flipped) your changes to both arms!
Note: The above changes deviate from our original reference sheet.
In this case I'm not worried, the reference was more of a guideline than the intended final look.
Step 14
It's looking better with each step!
But now with the arms fixed, something else is suddenly obvious.
Popping!
"What is 'popping'?" you might ask.
You can see it above. Focus on the knees as our character steps forward. It's visible in all views, but might be more obvious in the two orthographic views. Do you see how it looks less smooth, somehow? Almost like something is jittering as the knee straightens out to step forward?
Here's the frames of our character stepping, slowed down.
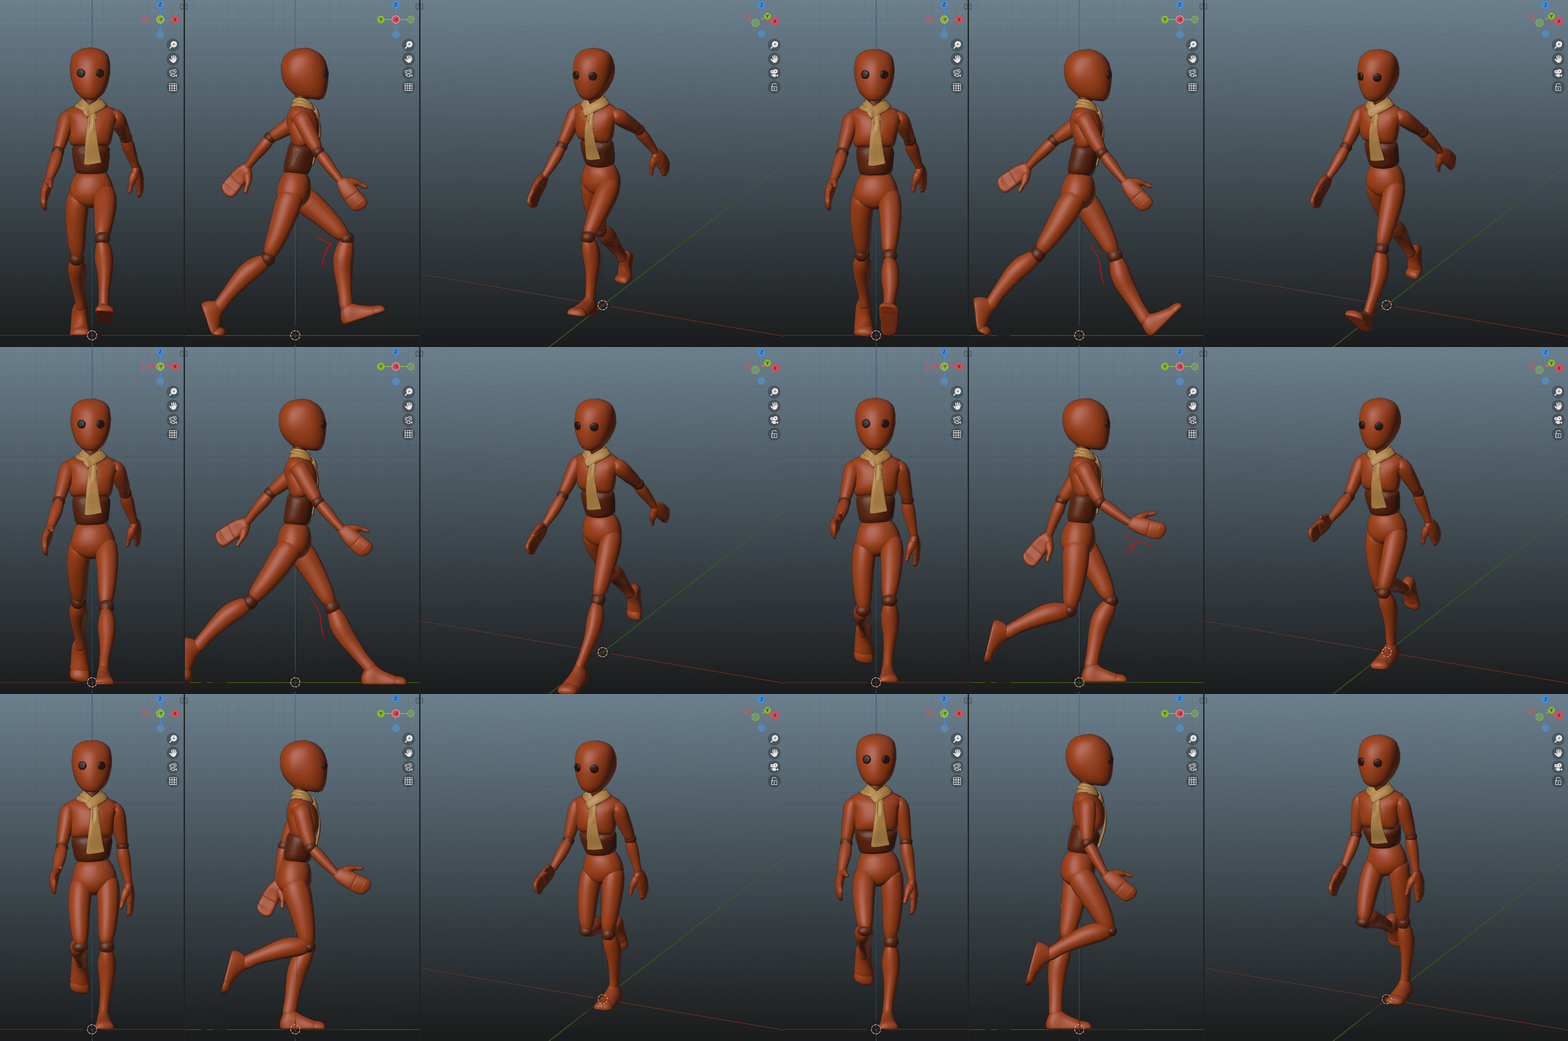
It looks fine slow. But you can tell where the popping would occur. It's when the frames take the knew from "very bent, to very straight, to very bent again" in the span of a new frames.
In other words, "popping" is when your animation transitions very fast between states, in a way that stands out among the rest of the animation. "Knee popping" is a particularly common form of it. It happens all the time, so you have to watch out.
In this case, the hand also "pops" a little bit too. It appears to suddenly jut upward juuuust enough that it's
distracting. It seems I overcorrected too much when fixing the arms earlier.
In this case, it's because I rotated the lower arm and hand too far. So instead of "just lagging by a frame or
so," it actually rotates past where the arm was in the prior frames, making appear as if it's being lifted
further.
Don't worry though, both these issues can be fixed.
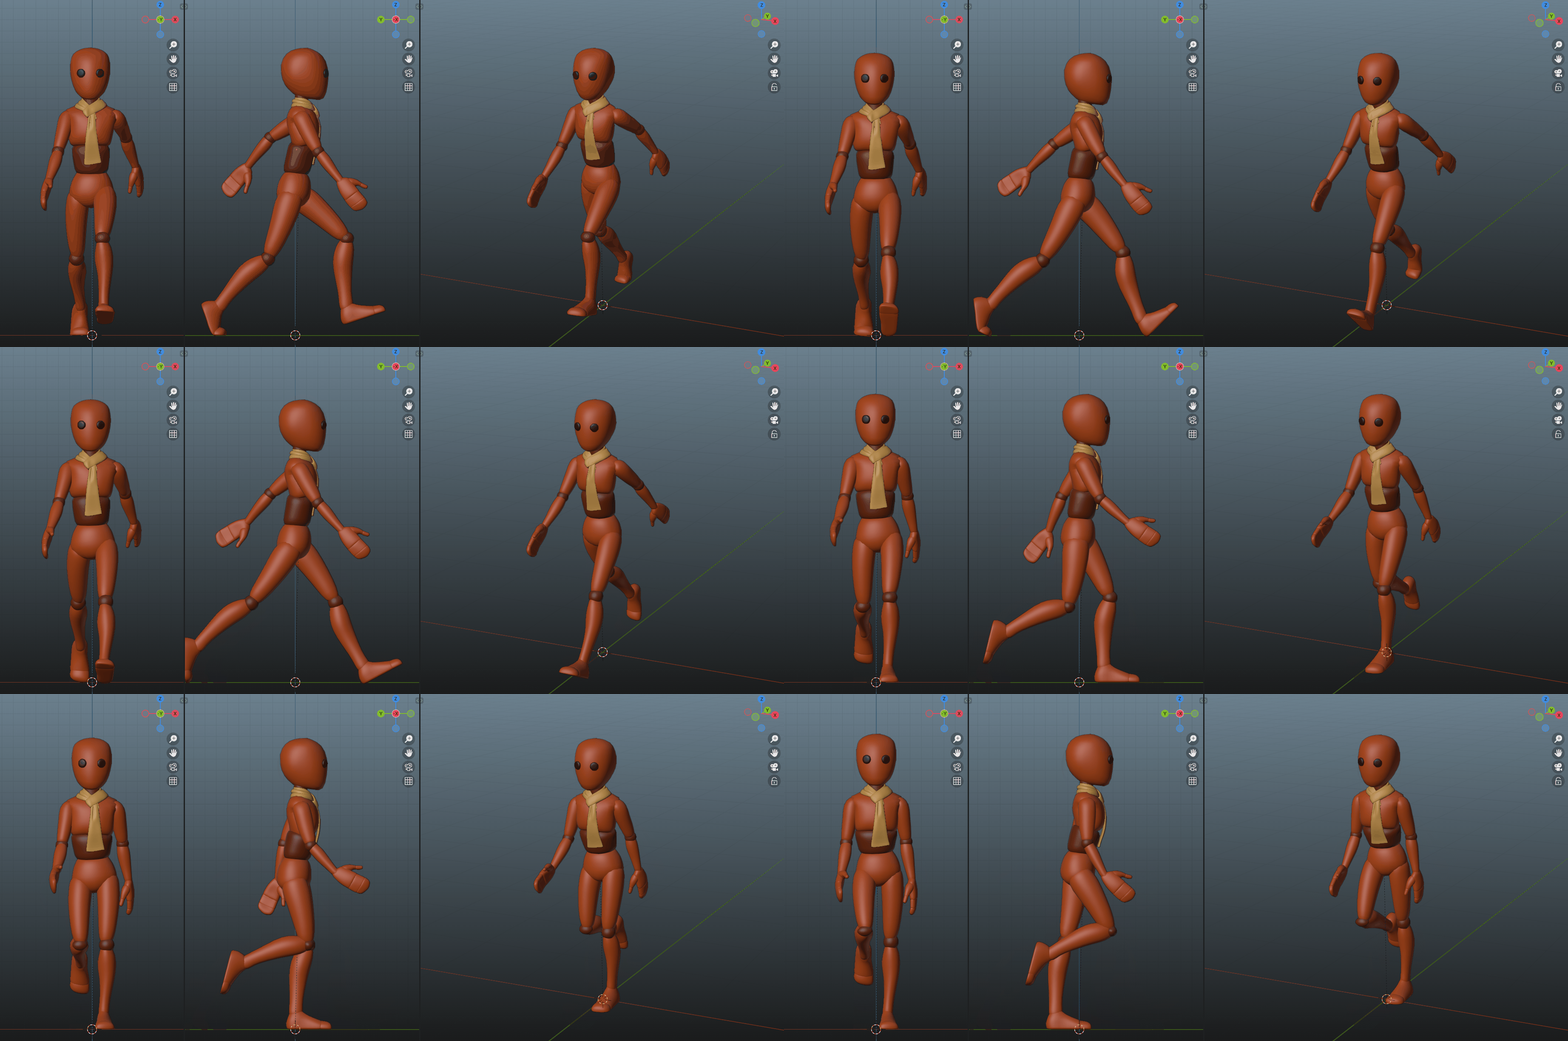
As you can see above, we can adjust the keyframes to account for both "popping" issues.
The hand is fixed by toning down how far it "lags" behind.
The knee is fixed by adjusting our leg bend. We can either lower/raise the hips (affects both knee bends), or
adjust foot placement and foot rotation.
In this case, I did both to make our knee movement less extreme across the four problematic frames.
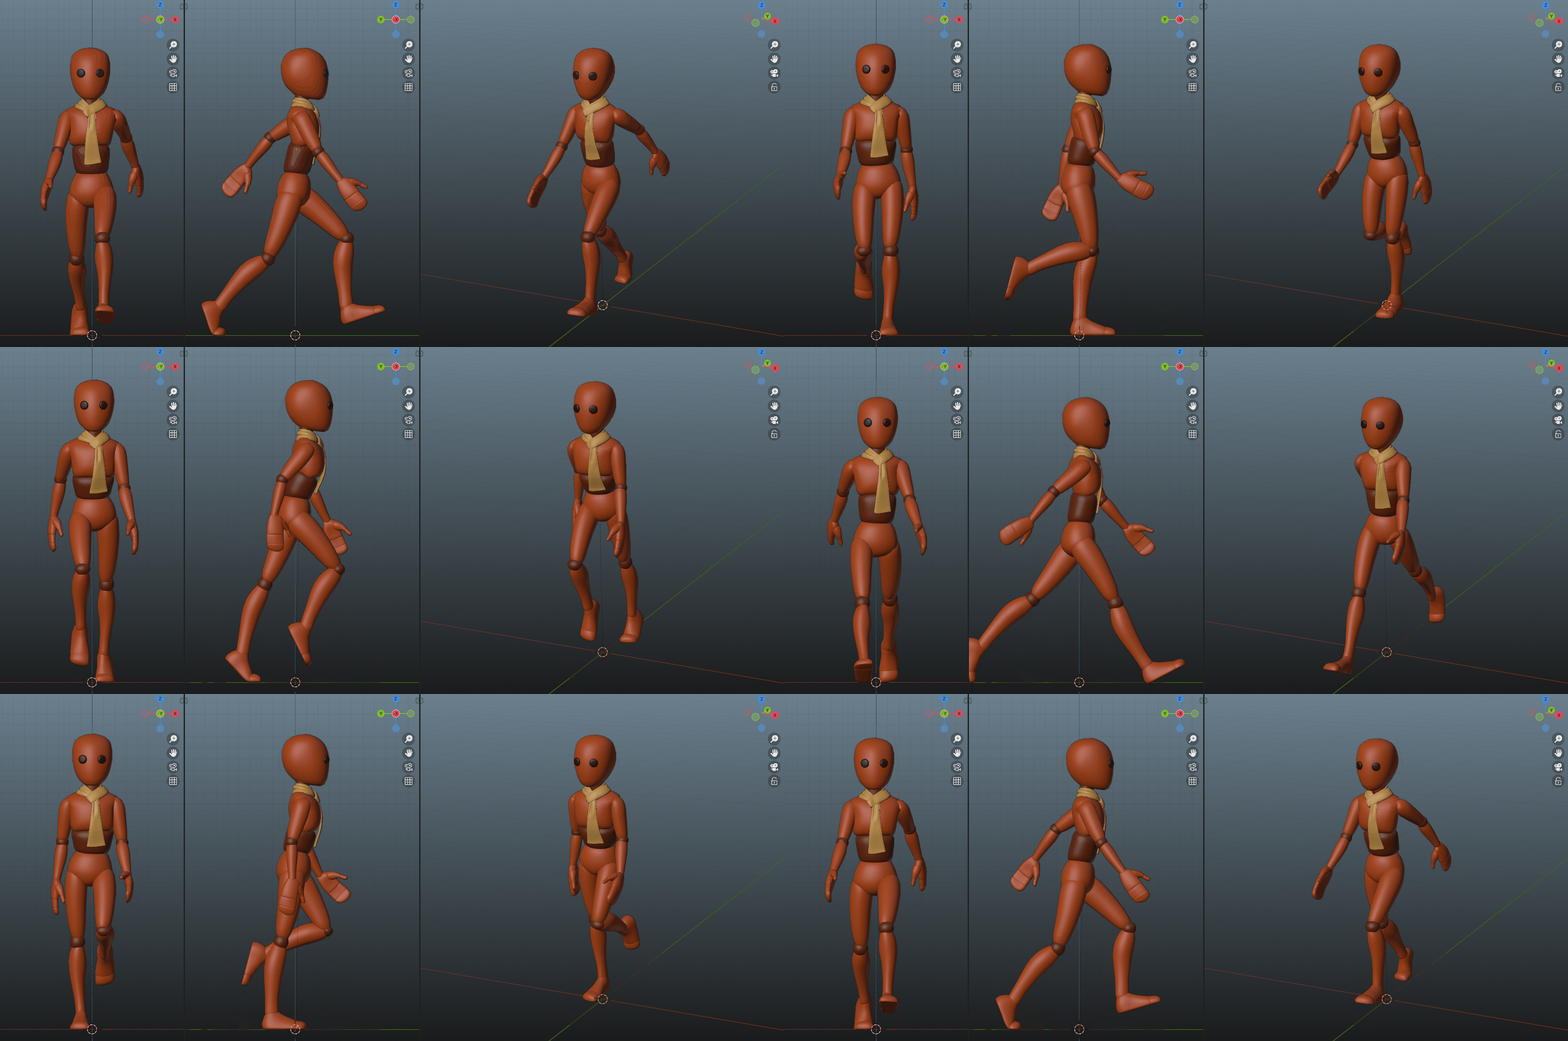
Now it's looking better!
Further Phases and Steps
It's looking really good now, and yet there's still more that can be improved!
Hopefully you can see how this process can keep going on and on.
Find something that looks off, that looks too fast or too slow, or that just looks too rigid, and focus on
that.
Fix what you can, then take a step back and focus on a different part of the body.
As you repeat this process, some areas that previously "looked right" might now look wrong. Don't get discouraged, it's a good thing! It happens because the overall animation has improved, so what were previously "minor issues" now stand out more. It's part of the refinement process!
Continue until you're happy with the final animation. Or until you can't figure out how to improve it further.
And remember, don't spend too long on this! You'll improve faster with varied experience.
Once you've improved, you can come back and work smarter! You'll see things you didn't notice before, and be
able to fix them faster too!
Improving This Specific Example
As far as improvements for the animation on this page, there are two major things that come to mind.
First, the arms still look kind of stiff in the front view. We have good forward-back motion in the arms, but not very good side-to-side motion.
Generally, arms/hands swing side-to-side slightly as a person walks. They tend to move in almost a figure-8 shape, so there normally is at least some side-to-side arm movements from the front view.
Second, the chest, neck, and head have been somewhat neglected, and also look kind of stiff.
For these, we simply need to spend more time on them. But you can see we have a respectable walk even without much time on these parts.
Third, we didn't really talk about the Graph Editor at all.
This was for simplicity, to keep this already-long tutorial on the shorter side.
In practice, most people prefer using the graph editor every step of the way, to help visualize what they're
doing.
If possible, it's helpful to check your curves on the graph editor.
When you can, adjust keys to make more fluid curves, which can sometimes help in making the character's
movements feel more organic. Obviously make sure you don't break your animation while you do so.
There's also an issue of our graph interpolations and how our key handles affect all of that.
We can see an example in the graph below, but basically our "frame 1" and "frame 25" should match as closely
as possible.
This includes the in-betweening that our software does, which is represented by the curved lines between our
keys. Called our "interpolation" lines.
If the curve going into our last frame (frame 25) doesn't match the line coming out of our first frame (frame 1), then there might be unintended juttering or popping as our animation loops.
For a visual example, we have the below image.
In this case, the starting frame is a straight horizontal line, but the ending frame is a curved line.
Failed to embed image. Missing either `src` or `alt`.
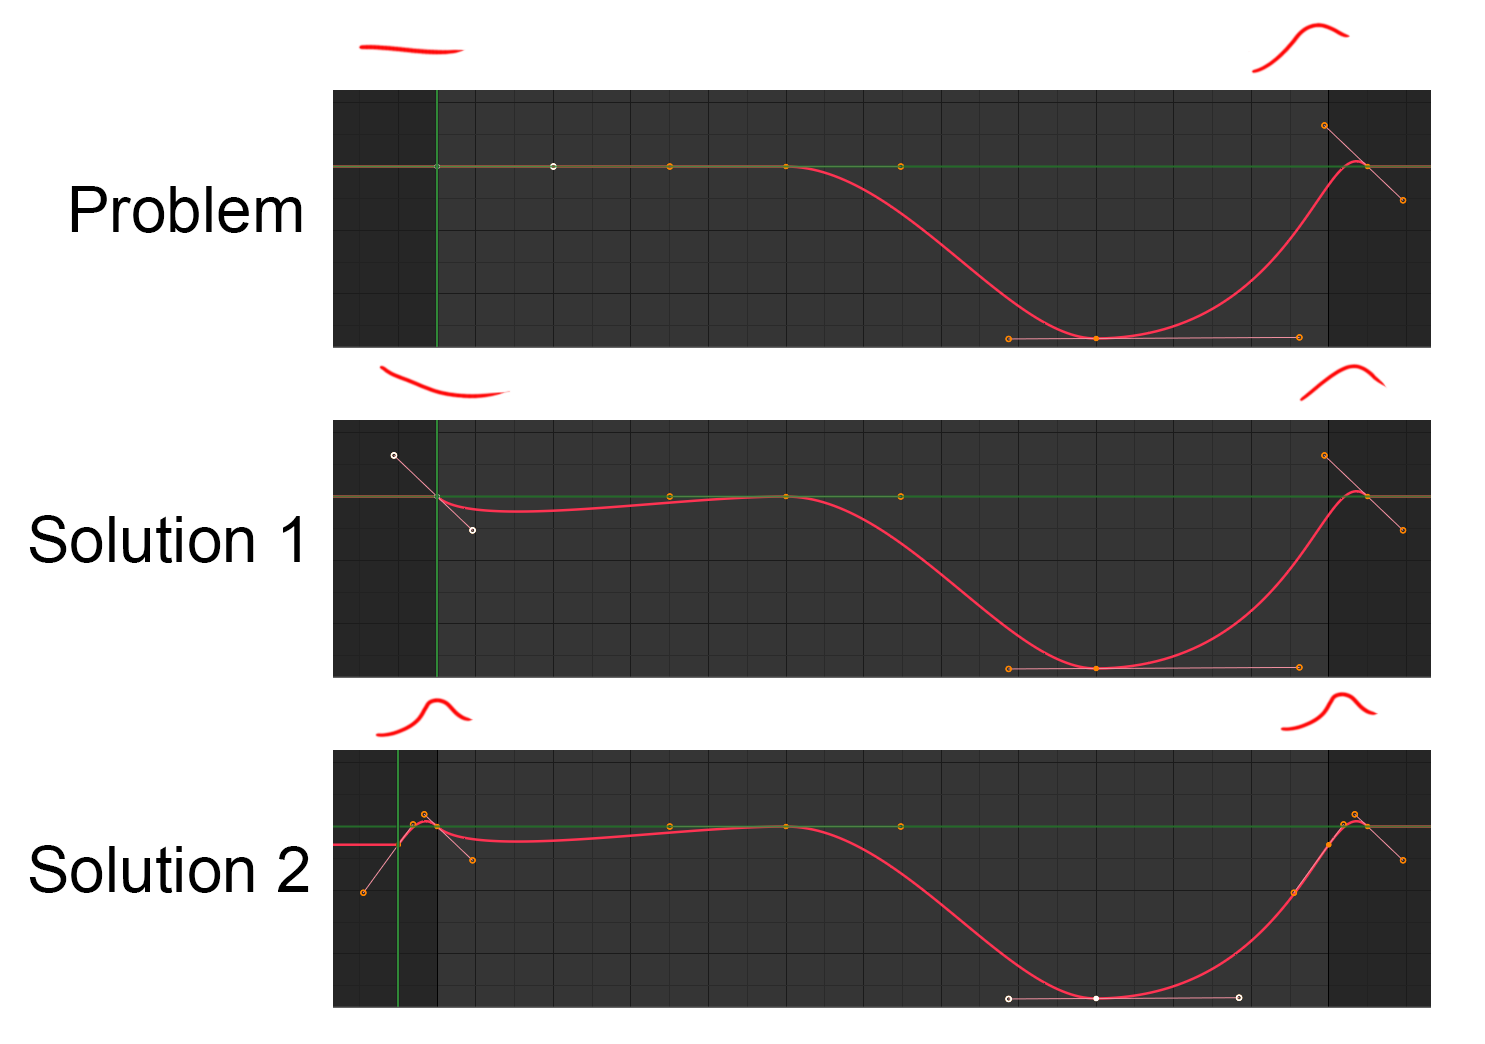
The exact solution depends on context of how the graph editor looks. But one option is to simply copy our frame 25 onto frame 1. That is shown in "solution 1" above.
However, in some situations, that's not enough and will still lead to misbehaving looping. In these cases, we can try keyframing on "frame 24" (possibly including some handle adjustments), and then copy that over to "frame 1" as well. This is shown in "solution 2" above.